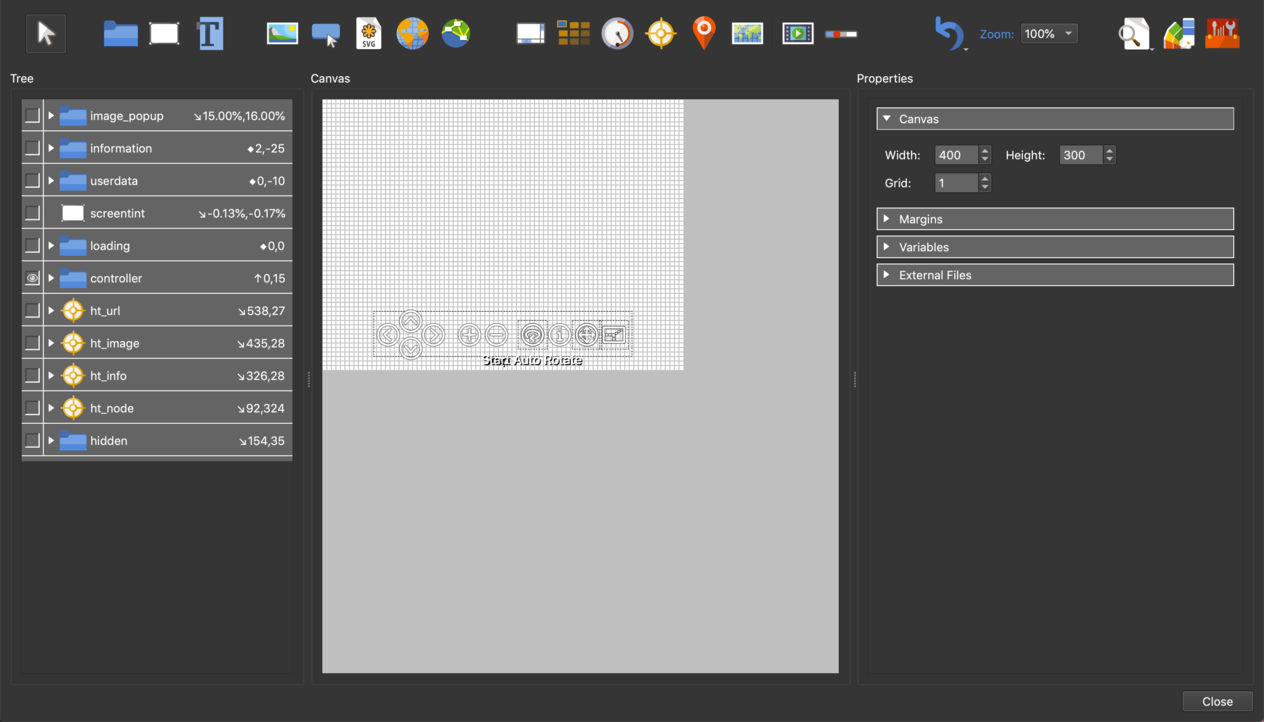
The Skin Editor
In Pano2VR, you can create and add a skin to your HTML5 outputs.
A skin, as a whole, is a graphical element (interface) that is layered over the panorama and can include images, buttons and sounds. For example, a controller skin includes graphical elements (buttons) that allow you to control the panorama.
The Skin Editor has 4 main sections: the Tree, the Canvas, Properties and the Toolbar.
- The Tree is where the skin elements are organized.
- The Canvas is where you build and design the skin – it’s your workspace.
- The Properties section is where you can edit each element and change the way it behaves through actions.
- The toolbar and menu bar also contain tools.
Introduction to the Skin Editor
The Basic Workflow
-
Open the Skin Editor using any of the following methods:
-
Customize the layout of the canvas in the Properties section:
-
Make sure no elements are selected. In the Properties section, Canvas panel, choose the size of the canvas and change the grid size.
-
Zoom in to the canvas using the Zoom control in the Toolbar.
-
-
Add elements to the skin. These can be buttons, images, SVGs, sounds, videos or external elements.
-
Go to the Toolbar and select any element, then click in the Canvas to add.
-
Go to the Menubar and choose, Elements. Select an element and then click in the Canvas to add.
-
Drag the elements on to the canvas.
-
-
Arrange the elements.
-
Apply actions to elements for user interactivity and control.
Select any element and go to the Actions panel in the Properties section. Double-click the empty table row or click the green plus icon.
For example, to make a button rotate/pan left, choose Mouse Click as the Source, and Pan Left as the Action.
✭ Tip: To quickly export a project to test the skin, go to the Tools menu and choose, Generate Output. This is only available when the skin is opened via the Output panel.
Understanding Skins
Learn how a skin works and then learn how to customize the built-in skins for your needs.
Built-in Skins
Pano2VR ships with fully functioning skins that you are free to use for your projects. You will find these skins in the Skin menu of the HTML5 output settings.
Silhouette
silhouette.ggsk
This is our latest skin design for version 5. It features the following:
- Works with HTML5 outputs
- Node preview image (pro only)
- Hotspot, Web and Image Popup icons
- Loading bar
- User Data info box
- Popup Image
Add a point hotspots and set its Type to Image. Select the image to pop up. - Controller with the following buttons:
- Zoom in and Zoom out
- Autorotate
- Information
- Move Mode
- Fullscreen
Simplex
simplex.ggsk
- Node Marker and icon
- Hotspot template and icon
- Loading bar
- User Data info box
- Controller with the following buttons:
- Pan Left/Right
- Tilt Up/Down
- Zoom in and Zoom out
- Autorotate
- Information
- Move Mode
- Fullscreen
Google Cardboard
cardboard.ggsk
Use this skin if you intend to view your panorama with a Google Cardboard Viewer.
-
Crosshair for pointing
-
Hotspot template and icon (simplex icon)
silhouette_cardboard.ggsk
The same as the above template, but uses the silouhette icon for node hotspots.
Skin Editor Keyboard Shortcuts
-
Hide the Tree and Properties with the keyboard shortcut, Shift-Alt-Tab (win) or Shift-Option-Tab (macOS).
-
Show and Hide the Panels within the Properties with Command-Shift-PageUp/Down (macOS) or Control-Shift-PageUp/Down (win)
Navigating
First, select an element in the Tree to enable navigation.
Use the up/down arrow keys to move up and down the Tree, activating elements as you go.
Use the left/right arrow keys to open containers.
Once an element is selected, use Tab to move to the Canvas. Hit Tab again to return to the Tree.
Auto-saved Skins
Pano2VR will save skin files every ten minutes. If the program closes unexpectedly and the current skin was not saved, the next time Pano2VR is opened, it will give you the opportunity to open the last auto-saved skin file. Once that file is saved, the file path will return to the original file, rather than in the auto-save folder.
