Skin Actions
Actions or a set of directions can be applied to any element added to the skin to create interactivity.
The actions are found in the Properties section of the Skin Editor for each element.
Double-click in the Actions area or hit the plus sign to the right to open the Action Settings.
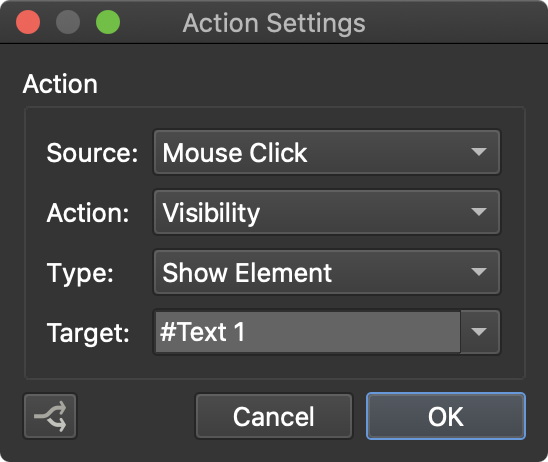
Source – Choose which event will cause the action to occur.
Action – Choose what will happen when the event occurs. For instance, if Pressed and Pan Left are chosen for a button’s action, and a user clicks on that button and holds down the mouse button, the panorama will pan left.
Depending on which action is chosen, different parameters that are associated with that action will appear. For example, for the pan actions, you can define the pan speed.
Expert Mode is found in most actions and allows manual entry of certain properties. Some advanced parameters can only be added in expert mode.
When setting a Target, the targeted element will highlight in the Canvas. Hovering your mouse over the target field in the Actions properties panel will also highlight the targeted element. If you’d like to address multiple elements and they have the same ID, you would use # in front of the target’s ID.
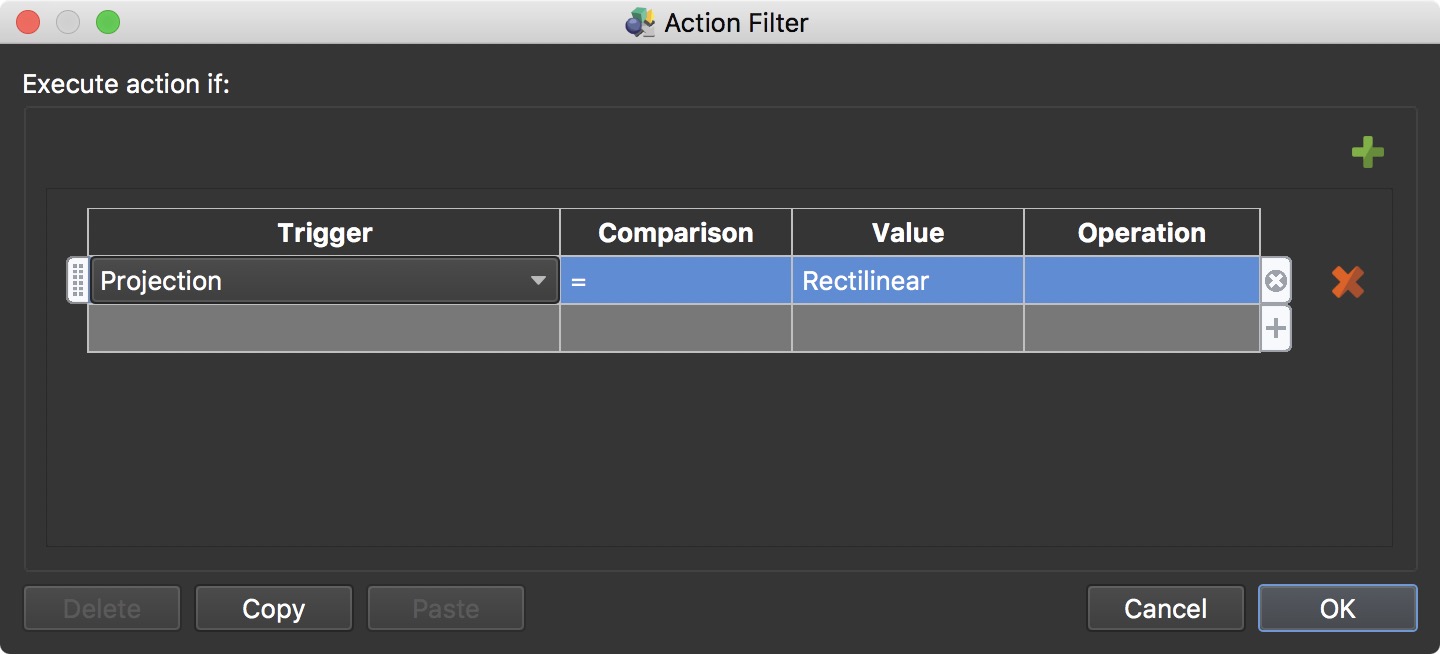
Use the Action Filter to create a condition for that action. This can be used so that the action will only execute if the condition is true.
The above states, to execute the action only if the current projection is Rectilinear. If the panorama is viewed in any other projection, the action will not execute.
Panorama Movement
Pan
This action is commonly used on buttons that have an arrow indicating left or right. Applying this action to an interactive button or image will cause the panorama to rotate to the left or right.
Type – Panning is the horizontal rotation, therefore you can only choose from Left or Right directions.
Speed – When you add a pan action, you get the option to adjust how fast or slow the pan will be. The speed is determined by a rate of degrees per frame.
✭ Entering the number, .40, will cause the panorama to rotate at a rate of four tenths of a degree per frame.
Tilt
This action is commonly used for buttons; especially ones that use an arrow indicating up or down. Applying this action to an interactive button or image will cause the panorama to tilt up or down.
Type – Tilt is the vertical rotation, therefore you can only choose from Up or Down.
Speed – When you add this action, you get the option to adjust how fast or slow the panorama will tilt. The speed is determined by a rate of degrees per frame.
✭ Entering the number, .40, will cause the panorama to rotate at a rate of four tenths of a degree per frame.
Zoom
When this action is applied to an interactive button or image, the panorama will narrow or broaden its field of view respectively.
Type – Choose to zoom In or Out.
Speed – When you add this action, you get the option to adjust how fast or slow the panorama will zoom in or out. The speed is determined by a rate of degrees per frame.
✭ Entering the number, .40, will cause the panorama to zoom at a rate of four tenths of a degree per frame.
Player Settings
Change Viewer Mode
This action changes between continuous and drag modes in Pano2VR.
Mode – Choose a mode:
-
Continuous Mode – Change the viewer to continuous mode where the panorama will constantly spin so long the mouse button is pressed. (
1) -
Drag Mode – Changes the viewer to drag mode where the user clicks and drags to move the panorama. (Expert:
0) -
Toggle Modes – This will toggle between the two modes. (
2)
Change Polygon Mode
Use this action to have an element in the skin change how polygon hotspots appear.
For Show One, Hide One and Toggle One you will need to enter the hotspot’s ID to target it.
Mode – Select a Polygon Hotspot Mode:
-
Always Hidden (Expert:
0) – Polygons are not visible but still active -
Always Visible (
1) -
Show Current (on hover) (
2) -
Show All (on hover) (
3) -
Disabled (
-1) – Disables all polygon hotspots -
Show One (
4) – Shows and activates a polygon hotspot ID -
Hide One (
5) – Hides and disables a polygon hotspot ID -
Toggle One (
6) – Toggles the visibility of a polygon hotspot ID
Change Polygon Color
Use this action to change the background and border color of a single polygon hotspot. Be sure to enter the hotspot’s ID to activate the setting.
Change Lensflares
If you’ve added Lens flares to your project, you can use this action to show or hide them. You cannot target specific lens flares.
Mode – Select from the following modes:
-
Show Lensflares (Expert:
0) -
Hide Lensflares (
1) -
Toggle Lensflares (
2)
Change Transition
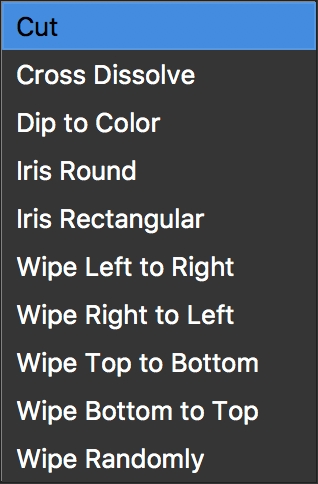
Transition Type – Choose the type of transition.
Effect Before – Set the effect that will happen before the transition takes place.
Effect After – Set the effect that will happen after the transition takes place.
Expert Mode – Expert mode will allow you to create even more precise transitions.
Once you select it, you’ll see something like this:
Values – crossdissolve/2/2
The following parameters (separated by /) can be added in the following order:
- Transition time (decimal, i.e. 1.5) (The default transition time is 1 second.)
- Wait for transition (boolean, i.e. true or false)
- Zoomed FOV (decimal)
- Zoom speed (decimal)
- Soft edge (integer)
- Dip to color (a string containing a hexadecimal color, like 0xffffff)
For example, if you want to change the transition time to 1.5 seconds the value string would be crossdissolve/2/2/1.5
To alter the zoom speed to 2.5 the value string would look like: crossdissolve/2/2/1.5/false/30.0/2.5
All parameters that are before zoom speed need to be specified before zoom speed because they must be added in the correct order:
transition/transition time/wait for transition/zoomed fov/zoomed speed/soft edge/dip to color
Gyro
The gyroscope is part of the player and can be controlled with skin elements. Choose from one of the following modes:
Enable Gyro – Choose to activate the gyroscope.
Disable Gyro – Choose to turn off the gyroscope.
Toggle Gyro – Choose this action to toggle between Enable Gyro and Disable Gyro.
Enable Gyro without Roll – Use this option to have the Gyro enabled, but without movement on the longitudinal axis (roll).
The gyroscope’s state (active) can also be used as a trigger in a logic block.
★ The gyrocscope will only work if the project is hosted on a secure site.
Fullscreen / VR
Type – Choose from the following Fullscreen actions:
-
Enter Fullscreen
-
Exit Fullscreen
-
Toggle Fullscreen – Action will toggle between the Enter and Exit types.
-
Enter VR
-
Exit VR (for future use)
-
Toggle VR (for future use)
Auto Rotate
Choose from the following Auto Rotate actions:
Start Auto Rotate
This action will start to rotate the panorama.
Speed – The speed is determined by a rate of degrees per frame.
✭ Entering the number, .40, will cause the panorama to rotate at a rate of four tenths of a degree per frame. A negative number will rotate it counterclockwise while a positive number will rotate clockwise.
Delay – The time it takes for the panorama to begin to rotate (in seconds) again after it has been manually moved by the user.
Return to Horizon – Brings the panorama’s center perspective (horizon) back into view after it has been manually tilted upwards or downwards. A value of 0 will equate to no return, and an increase in the value will return the image to the horizon at a quicker speed.
Expert Mode – Here, you can enter Speed, Delay and Return to Horizon in the Speed field. For example: 0.4/5/0.4.
Stop Auto Rotate
Use this action to stop autorotation.
Toggle Auto Rotate
Select this action to toggle between Start Auto Rotate and Stop Auto Rotate.
Start Animation
Use this action to start an animation sequence based on the animation created in the project.
Sequence – Choose the animation sequence.
✭ Once Auto Rotate is activated and after no mouse activity for 3 seconds, the cursor will hide. It will reappear when the mouse moves again.
View
Apply these actions to a skin element to move the panorama to a specified point or view.
Set Default View
This action will jump to the default view.
Move to Default View
This action will cause the panorama to move back to the default view. You can specify the speed of this movement.
Speed – The speed is determined by a rate of degrees per frame. For example: Entering, .40, will cause the panorama to move at a rate of four tenths of a degree per frame.
Easing Function – Choose the interpolation between views.
-
Ease Out – This will ease out (slow down) the movement as it gets closer to the default view. (Expert:
0) -
Ease In Out – Ease in/Ease out in which the movement back to default view will accelerate at the start and then slow down at the end of the movement. (
1) -
Ease Out Back – This movement is similar to Ease Out except that at the end of the movement, it moves slightly beyond the default view and then returns to the default view. (
2) -
Linear – The movement will be at a constant speed from beginning to end. (
3)
Expert Mode – Select to manually add the Speed and Easing Function.
Set View
This action will jump to the specified view:
Pan – Enter the Pan value.
Tilt – Enter the Tilt value.
FoV – Enter the Field of View value.
Projection – Set the projection:
-
Keep Current – Keep the current projection the player is using; no change to the currently viewed projection. (Expert:
-1) -
Rectilinear (
4) -
Stereographic (
9) -
Fisheye (
12)
Expert Mode – Select to enter the exact location of the view using the Pan, Tilt and Field of View parameters. Enter the parameters separated by forward slashes (/): 324.0/-3.5/70.0 (Pan/Tilt/FoV). You can also enter Projections using the numbers listed above.
Move to View
This action will cause the panorama to move to the specified view. You can set the speed of this movement and the easing function.
Pan – Enter the Pan value.
Tilt – Enter the Tilt value.
FoV – Enter the Field of View value.
Speed – The speed is determined by a rate of degrees per frame. For example: Entering the number, .40, will cause the panorama to move at a rate of four tenths of a degree per frame.
Projection – Set the projection:
-
Keep Current – Keep the current projection the player is using; no change to the currently viewed projection. (Expert:
-1) -
Rectilinear (
4) -
Stereographic (
9) -
Fisheye (
12)
Easing Function – Choose the interpolation between views.
-
Ease Out – This will ease out (slow down) the movement as it gets closer to the default view. (Expert:
0) -
Ease In Out – Ease in/Ease out in which the movement back to default view will accelerate at the start and then slow down at the end of the movement. (
1) -
Ease Out Back – This movement is similar to Ease Out except that at the end of the movement, it moves slightly beyond the target view before returning to the target view. (
2) -
Linear – The movement will be at a constant speed from beginning to end. (
3)
Expert Mode – Select to enter the exact location of the view using Pan, Tilt and Field of View, Projections and Easing Functions. Enter the parameters separated by forward slashes (/): 324.0/-3.5/70.0/4/1 (Pan/Tilt/FoV/Projection/Easing). Speed can also be added here.
Change Projection
Apply this action to an element to change the current view’s projection.
Projection – Set the projection:
-
Rectilinear (
4) -
Stereographic (
9) -
Fisheye (
12)
Speed – The speed is determined by a rate of degrees per frame. For example: Entering the number, .40, will cause the panorama to move at a rate of four tenths of a degree per frame.
Expert Mode – Select to enter the values for Projection and Speed as numbers.
Go To URL
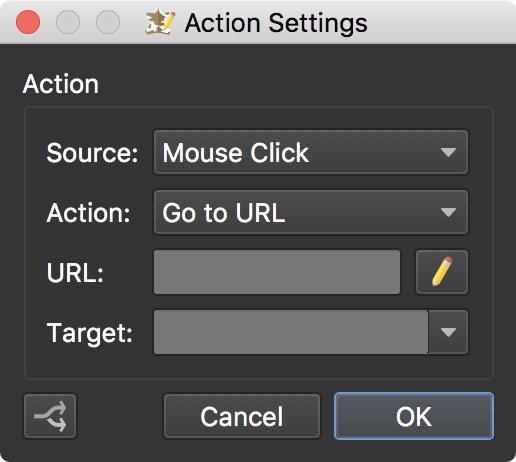
When an element is given this action, interaction with this element will send the user to a specified URL. It is generally good practice to use this action for opening HTML files or web links.
URL – Enter the path of the web page or HTML file. You can also enter a placeholder here. For example, $(hu) will call the URL used in the URL field of the Hotspots Viewer Mode. Use the Edit button (to the right of the URL field) to open a larger text field to allow easier editing of the URL.
Target – Add a target to specify where to open the website. You can also use placeholders here. For example, you could use $(ht) which will use the target specified in the Link Target URL field of the hotspot.
Open Next Panorama
Opens the following panorama. Pan, FoV, and Tilt can also be specified.
URL – Enter the file name of an HTML5 output (XML) or web URL or choose from the list provided. If you are using Pano2VR Pro and have a tour loaded, you will see a list of the tour nodes to choose from.
-
Enter URL – Add the XML or web URL.
-
Hotspot URL – Use the hotspot URL provided in the Link Target URL field of the hotspot linked to the hotspot template. (Expert:
$(hu)) -
Next Node – Will open the next node in a tour (as they are ordered in the Tour Browser). (
{$next}) -
Previous Node – Opens the previous node in a tour. (
{$prev}) -
Last Visited Node – Opens the last visited node. (
{$back}) -
Go Back One Node – This is will take the user back through tour in the order they moved.(
{$(goback)})
✭ In a situation where a user moves from node1 to node 2 to node 3 and then to node 4, the action, Go Back One Node would take the user back to node 3, then to node 2 then finally to node 1. Last Visited Node, however, would take the user from node 4 to node 3, but then it would go back to node 4. -
Tour Panoramas – If using Pano2VR pro, you can choose any tour node to open next. (
{node1}where 1 is the number of the node)
View – Select the view the next panorama will open with:
-
Default View – The view that has been defined in Viewing Parameters. In Expert Mode leave the Pan/Tilt/FoV field empty to use the default view.
-
Current View – This will apply the current Pan, Tilt and FoV positions to the next panorama. (Expert:
$(cur)) -
Specific View – Here, you can have the next panorama open up to a newly defined view. Enter the Pan, Tilt and FoV positions in the fields below. (Pan/Tilt/FoV:
324.0/-3.5/70.0) -
Target View – When this is applied to a hotspot template the Target View specified in a hotspot’s parameters will be used. (
$(ht)) -
Forward – This will move from current node to the next and will keep the same pan/tilt/fov values while correcting for North, so the direction is always looking forwards. (
$(fwd)) -
Backward – Similar to forward but the direction looks backwards when moving from one node to another. (
$(bwd))
Expert – Select to enter the URL or node and Pan/Tilt/FoV.
Position
Position actions will move the target element’s position within the skin. Choose from the following Position action types:
Set Element Position
This action will jump the targeted element to the defined position.
-
Offset X/Y – Enter the amount of pixels the element should move along the X and Y axes.
-
Target – Select the targeted element.
-
Expert Mode – Select to enter the Offset X/Y using a forward slash:
10/5.
Change Element Position
When this action is applied, it will cause the targeted element to visibly move from its current position to the position defined in the Offset X and Y fields.
-
Offset X/Y – Enter the amount of pixels the element should move along the X and Y axes. Negative values can be used.
-
Transition Time – Set the time it takes for the element to change position. The default is 1 second.
-
Target – Select the targeted element.
-
Expert Mode – Select to enter the Offset X/Y using a forward slash:
10/5.
Toggle Element Position
Toggles the element from its current position to the specified location (and back).
-
Offset X/Y – Enter the amount of pixels the element should move along the X and Y axes. Negative values can be used.
-
Transition Time – Set the time it takes for the element to change position. The default is 1 second.
-
Target – Select the targeted element.
-
Expert Mode – Select to enter the Offset X/Y using a forward slash:
10/5.
Set Relative Position
Use this action to change an element’s position to a set amount with each button click. With each click the relative position is changed.
-
Offset X/Y – Enter the amount of pixels the element should move along the X and Y axes.
-
Limit – Select, Use Limits, to enable. Enter the total pixels the element should move. Useful for navigating flat images, image galleries and manually created thumbnail scrollers.
For example, if the Offset is set to 10px for X and the Limit to 100px for X, the element will move 10 pixels to the right at every mouse click (or any other source), until it has moved the length of 100 pixels. Likewise, a setting of -10px for the X offset and 0 for the X limit, it will move the element to the left until it reaches the limit of 0
-
Target – Select the targeted element.
-
Expert Mode – Select to enter the Offset X/Y using a forward slash:
10/5.
Change Relative Position
This action functions the same way as Set Relative Position except that the change along the path will be visible (as opposed to jumping to the position).
-
Offset X/Y – Enter the amount of pixels the element should move along the X and Y axes. Negative values can be used.
-
Limit – Select, Use Limits, to enable. Enter the total pixels the element should move. Useful for navigating flat images, image galleries and manually created thumbnail scrollers.
For example, if the Offset is set to 10px for X and the Limit to 100px for X, the element will move 10 pixels to the right at every mouse click (or any other source), until it has moved the length of 100 pixels. Likewise, a setting of -10px for the X offset and 0 for the X limit, it will move the element to the left until it reaches the limit of 0.
-
Transition Time – Set the time it takes for the element to change position. The default is 1 second.
-
Target – Select the targeted element.
-
Expert Mode – Select to enter the Offset X/Y using a forward slash:
10/5.
Scroll Into View
Use this to scroll elements into view that are inside a Scroll Area but are out of view.
Scroll By
Set the x and y offset to scroll the content of a Scroll Area. The target must be a scroll area.
Set Element Size
Size – Enter the desired element size in pixels. The change will be abrupt; immediately changing from one size to the next.
Change Element Size
Size – Enter the desired element size in pixels. The change will be smooth and visible until the element reaches the indicated size.
Transition Time – Set the length of the transition from previous size to the new size.
Angle
Set Element Angle
This action will rotate the targeted element. The change will be jumpy.
Angle – Set the angle.
Target – Choose which element will be affected by the action.
Expert Mode – Select to enter the angle as a float value.
Change Element Angle
This action will rotate the targeted element. The change will be smooth.
Angle – Set the angle. Negative values can be used. If you’d like spin 30º to the left, use -30.
Transition Time – Define the time it takes to transition from the starting angle to the angle defined.
Target – Choose which element will be affected by the action.
Expert Mode – Select to enter the angle as a float value.
Toggle Element Angle
Use this action to toggle or switch between default and specified angles.
Angle – Set the angle. Negative values can be used. If you’d like spin 90º to the left, use -90.
Transition Time – Define the time it takes to transition from the starting angle to the angle defined.
Target – Choose which element will be affected by the action.
Expert Mode – Select to enter the angle as a float value.
Visibility
Choose from the following Visibility action types:
-
Show Element – This action will show the targeted element.
-
Hide Element – This action will hide the targeted element.
-
Toggle Element Visibility – This action will toggle between the Show and Hide Element actions.
-
Add Element – Use this action to add an element to a parent element. This is especially useful for adding an element to a cloner that is set to Auto Size. See: Cloner Element
-
Remove Element – Use this action to remove an element from its parent. This is especially useful for removing an element from a cloner that is set to Auto Size which will then resize the cloner. See: Cloner Element
Target – Choose which element will be affected by the action.
Alpha
Set Element Alpha
This action will adjust the opacity of the targeted element to the parameter set in the Alpha field.
Alpha – Enter the amount of opacity for the element. Alpha is based on percentage values. The float value, 1, represents 100%, .50 represents 50%, etc. Select Expert Mode to enter a more specific value.
Target – Choose which element will be affected by the action.
Change Element Alpha
The element’s alpha channel will gradually change from the alpha set in the element’s settings tab to the parameter applied in the Alpha field.
Alpha – Enter the amount of opacity for the element. Alpha is based on percentage values. The float value, 1, represents 100%, .50 represents 50%, etc. Select Expert Mode to enter a more specific value.
Transition Time – Define the time it takes to transition from the default setting to the setting defined here.
Target – Choose which element will be affected by the action.
Toggle Element Alpha
Toggle between opacity parameters. The parameter set in the Alpha field will be applied on the first interaction, then back to its default state (set in the settings tab) on the second interaction.
Alpha – Enter the amount of opacity for the element. Alpha is based on percentage values. The float value, 1, represents 100%, .50 represents 50%, etc. Select Expert Mode to enter a more specific value.
Transition Time – Define the time it takes to transition from the default setting to the setting defined here.
Target – Choose which element will be affected by the action.
Scale
Set Element Scale
The element will be scaled up or down depending on the parameter set in the Scale X/Y fields. The scaling will not be animated.
Scale X/Y – Enter the scale parameters here. Scale is based on percentage values.
- Link X and Y Scale – Select to maintain aspect ratio.
Target – Choose which element will be affected by the action.
Expert Mode – Enter the scaling for X and Y as float values. The float value 1, represents 100%, .50 represents 50%. For example: .5/.25 will scale the element’s x-axis down 50% and its y-axis to 25%.
Change Element Scale
The element will be changed to the scale parameters set in the Scale X/Y fields. The scaling will be visible (animated).
Scale X/Y – Enter the scale parameters here. Scale is based on percentage values.
- Link X and Y Scale – Select to maintain aspect ratio.
Transition Time – Define the time it takes to transition from the default setting to the setting defined here.
Target – Choose which element will be affected by the action.
Expert Mode – Enter the scaling for X and Y as float values. The float value 1, represents 100%, .50 represents 50%. For example: .5/.25 will scale the element’s x-axis down 50% and its y-axis to 25%.
Toggle Element Scale
The element will change to the specified scale parameters on the initial action, then scale back to its default parameters set in the settings tab.
Scale X/Y – Enter the scale parameters here. Scale is based on percentage values.
- Link X and Y Scale – Select to maintain aspect ratio.
Transition Time – Define the time it takes to transition from the default setting to the setting defined here.
Target – Choose which element will be affected by the action.
Expert Mode – Enter the scaling for X and Y as float values. The float value 1, represents 100%, .50 represents 50%. For example: .5/.25 will scale the element’s x-axis down 50% and its y-axis to 25%.
Trigger Click
Use the Trigger Click action to prompt a mouse click action (without an actual mouse click).
Target – Choose which element will be affected by the action.
Set Value
The Set Value action allows you to dynamically change elements.
It can be used for example, to dynamically set file paths for the external image loader to display different content.
For example: Value = pictures/image01.jpg and Target = external 01.
If you are outputting an HTML5 project, you can use this action to display framed content (video, objects, panoramas), using a text field.
If you’re using Pano2VR Pro, you can also use this action to filter node markers on a map using tags set in User Data.
Value – Enter the Value to be set. Use the Edit button (to the right of the Value field) to open a larger text field to allow easier editing of the value. The value can be tags, a video ID, and even placeholders.
Target – Choose which element will be targeted by the action.
Text Field
Use the Set Value action to dynamically change the text in a text field. This could be body text, HTML to display an iFrame, or Javascript for more advanced applications.
Source = Mouse Click; Action = Set Value; Value = Add text, iframe, javascript here; Target: Text 1
Cloner
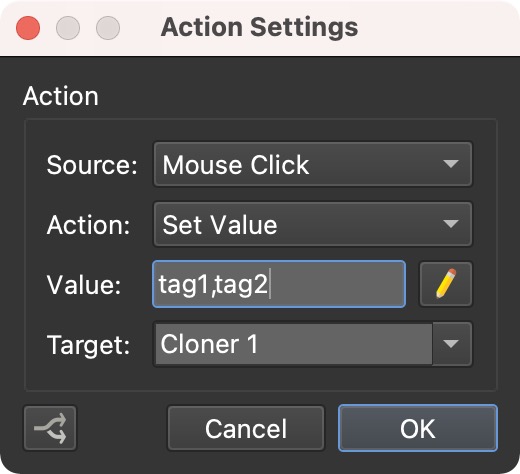
Dynamically change the tags that the filter is using. This means you can use a single cloner to show “groups” of nodes. You may start the cloner showing all images tagged with floor1, but when you move to Floor 2, you can change the value/tag to floor2 which show only nodes with that tag.
Source = Mouse Click; Action = Set Value; Value = floor1,floor2; Target: Cloner
★ Note that tags must be separated by comma with no spaces.
External Image Loader
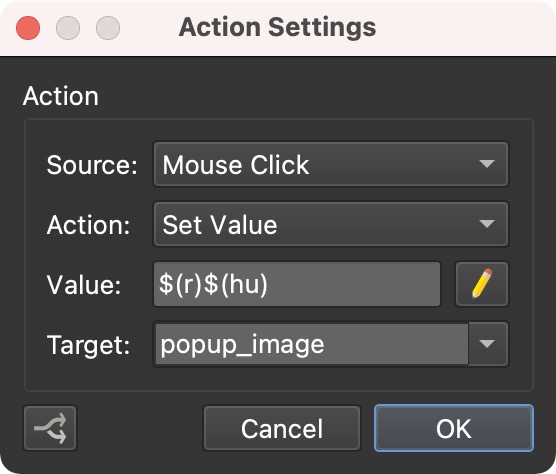
Dynamically change the external image’s (or other media) location (URL). For example, you may have a hotspot template for a pop-up image. To dynamically change the image that is shown you can use the placeholder, $(hu) or $(r)$(hu) for use in WordPress sites. Leave the External Image Loader’s setting, External URL blank.
Source = Mouse Click; Action = Set Value; Value = $(r)$(hu); Target: hotspot-template
Video Element
Just like the External Image Loader, you can use the Set Value action to change out videos. However, you cannot change the type of video (file, YouTube, Vimeo, URL).
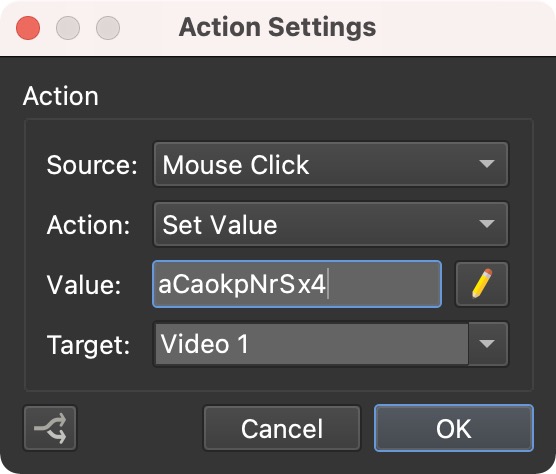
To change the video of a YouTube type:
Source = Mouse Click; Action = Set Value; Value = aCaokpNrSx4; Target: Video 1
★ Note that you only need the YouTube ID, not the entire URL. The same goes for Vimeo videos.
Map Element
Interactive map pins shown on a map or floor plan can be filtered using Set Value.
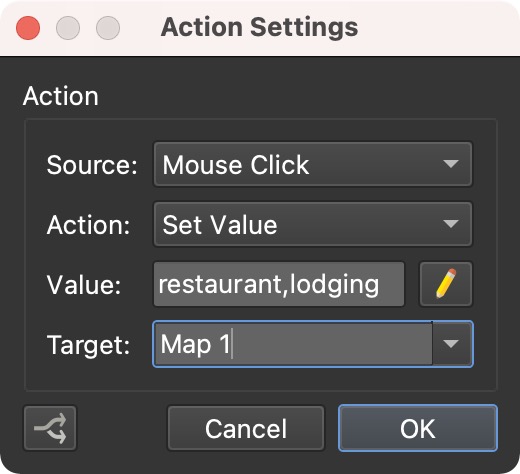
For example, tags assigned to nodes (i.e, park, restaurant, lodging) can be used as the value. In your tour, if you wanted to show where all the restaurants were on a map, you would use the tag, restaurant. If you wanted to show where the restaurants and lodging are, but not the parks, you would add the tags, restaurant and lodging.
Source = Mouse Click; Action = Set Value; Value = restaurant; Target: Map 1
Timer Element
The Set Value action can be used to manually set the timer to activate or deactivate skin elements. This is useful for delaying skin actions. Change the Timer’s Type to Manual.
For example, a button could be used to resize an element and then after a delay, position the element. When the button is clicked, the timer is activated and the element is scaled. At the same time, the timer is set to a delay. When the timer is deactivated, the element’s position will change.
Give the Timer the following actions:
-
Source = Activate; Action = Scale; Type = Change Element Scale; Scale = enter new scaling; Target = the element to scale
-
Source = Deactivate; Action = Position/Size; Type = Change Element Position; Offset = enter new position; Transition = 1.000s; Target = the element to change position
Then give the button this action:
- Source = Mouse Click; Action = Set Value; Value = number of seconds for delay; Target: Timer 1
Media
Play Media
An action to playback the audio and video.
Loop – Set the amount of times the media should play back.
0 = play back a continuous loop
1 = single playback
n = play back n times
Target – Choose the media element that should be targeted. Any media files added to the skin or to the Viewer, will also appear in this list.
-
_background – Targets background audio.
-
_videopanorama – Targets the playback of a video panorama.
Pause Media
This action will pause the targeted media.
Target – Choose the media element that should be targeted. Any media files added to the skin or to the Viewer, will also appear in this list.
-
_main – Targets all media added to the project and the skin.
-
_background – Targets background audio.
-
_videopanorama – Targets the playback of a video panorama.
Stop Media
This action will stop the targeted media. Any media files added to the skin or to the Viewer, will also appear in this list.
Target – Choose the media element that should be targeted:
-
_main – Targets all media added to the project and the skin.
-
_background – Targets background audio.
-
_videopanorama – Targets the playback of a video panorama.
Play/Pause Media
Use this action on a button to toggle between playing the targeted media or pausing it. Any media files added to the skin or to the Viewer, will also appear in this list.
-
Loop – Set the amount of times the media should play back.
0= play back a continuous loop1= single playbackn= play back n times
Target – Choose the media element that should be targeted. Any media files added to the skin or to the Viewer, will also appear in this list.
-
_background – Targets background audio.
-
_videopanorama – Targets the playback of a video panorama.
Play/Stop Media
This action will toggle between playing the targeted media or stopping it. When playing after stopping, the media will return to its starting position.
-
Loop – Set the amount of times the media should play back.
0= play back a continuous loop1= single playbackn= play back n times
Target – Choose the media element that should be targeted. Any media files added to the skin or to the Viewer, will also appear in this list.
-
_background – Targets background audio.
-
_videopanorama – Targets the playback of a video panorama.
Seek Media
Use this action to skip forward or backward in a media file by a given amount of time.
Time Difference – Set how many seconds the media should seek. Use a negative value to jump backwards.
Target – Choose the media element that should be targeted. Any media files added to the skin or to the Viewer, will also appear in this list.
-
_background – Targets background audio.
-
_videopanorama – Targets the playback of a video panorama.
Activate Media
Activate any media element added to the panorama (in the Viewer). If you add this to a button, it will pop out the media (image and video) and play it (video and audio).
Mode – Select an activation mode:
-
Activate
-
Deactivate
-
Toggle
Target – Choose the media element that should be targeted. Any media files added to the skin or to the Viewer, will also appear in this list.
-
_background – Targets background audio.
-
_videopanorama – Targets the playback of a video panorama.
Visibility Media
Use this action to set the visibility of pinned images and videos.
Mode – Select a visibility mode:
-
Show
-
Hide
-
Toggle
Transition Time – Set the amount of time it takes to change the visibility of the pinned media.
Target – Choose the pinned media’s ID from the target list.
Volume
Set Volume
Apply this action to a button to set the volume of the media to a specified level. It will jump from it’s current level to the level set. This is often used for mute buttons.
Level – Set the amplitude. The maximum loudness is 100% or 1.00 in Expert Mode.
Target – Choose the media element that should be targeted:
-
_main – Targets all media added to the project and the skin.
-
_background – Targets background audio.
-
_videopanorama – Targets the playback of a video panorama.
-
ID – Targets the media item with the given ID.
Change Volume
Apply this action to a button to change the volume level.
Level – Set the amplitude. The maximum loudness is 100% or 1.00 in Expert Mode. Set the amount of change that should happen. For example, if the sounds is playing at 100% (maximum loudness), and you want to lower the volume by half, then use -50%. If the sound is currently playing at 80% and you want the volume to change to 100%, use 20%.
Target – Choose the media element that should be targeted:
-
_main – Targets all media added to the project and the skin.
-
_background – Targets background audio.
-
_videopanorama – Targets the playback of a video panorama.
-
ID – Targets the media item with the given ID.
Video Panoramas
These actions are for 360º Videos.
Type – Choose from the following Video Panorama action types:
-
Play – Apply to an element to play back video.
-
Stop – Apply to an element to stop video playback.
-
Pause – Pause the video.
-
Fast Forward – Fast Forward through the video.
-
Reverse – Rewind the video.
Maps
This action can be used to change maps created in the Tour Map, or to zoom in and out of maps added to the Map element.
Type – Choose the type of map action:
-
Change Map – This will change the map that is being displayed in the map element.
-
Zoom In – To zoom in on the map.
-
Zoom Out – To zoom the map out.
-
Map Bounds – This will recenter and zoom the map to it’s bounds to show all nodes.
Map ID – Choose a map to change to.
Target – Select the targeted skin map.
Set Variable Value
Use this action to set a Variable that has been defined in the skin properties.
Variable Name – Choose the variable to set. This list will be populated with the variables listed in the skin’s properties.
Operation – Choose the operation you want to apply to the variable. The available operations will depend on the variable type.
-
Set(=) (Expert:
0) -
Add(+) (
1) -
Sub(-) (
2) -
Mul(*) (
3) -
Div(/) (
4) -
Mod(%) (
5) -
Min(∧) (
7) -
Max(∨) (
6)
Value – Set a value for the operation. Only values that suit the variable type are possible.
Expert Mode – Use this to use numerical values for the operation type.
Learn how variables are used in the skin editor.
