Create a Website Popup
Learn how to create a popup up window using the URL type Point Hotspot and a Text Element in the skin.
Open a Webpage in a Pop-up Window
With a little work in the Skin Editor, you can open a webpage in a popup window so visitors aren’t taken out of the project. In this exercise, we’ll open a webpage in a Text Box that pops up. However, a pop-up can be added to the skin using the built-in point hotspot components.
-
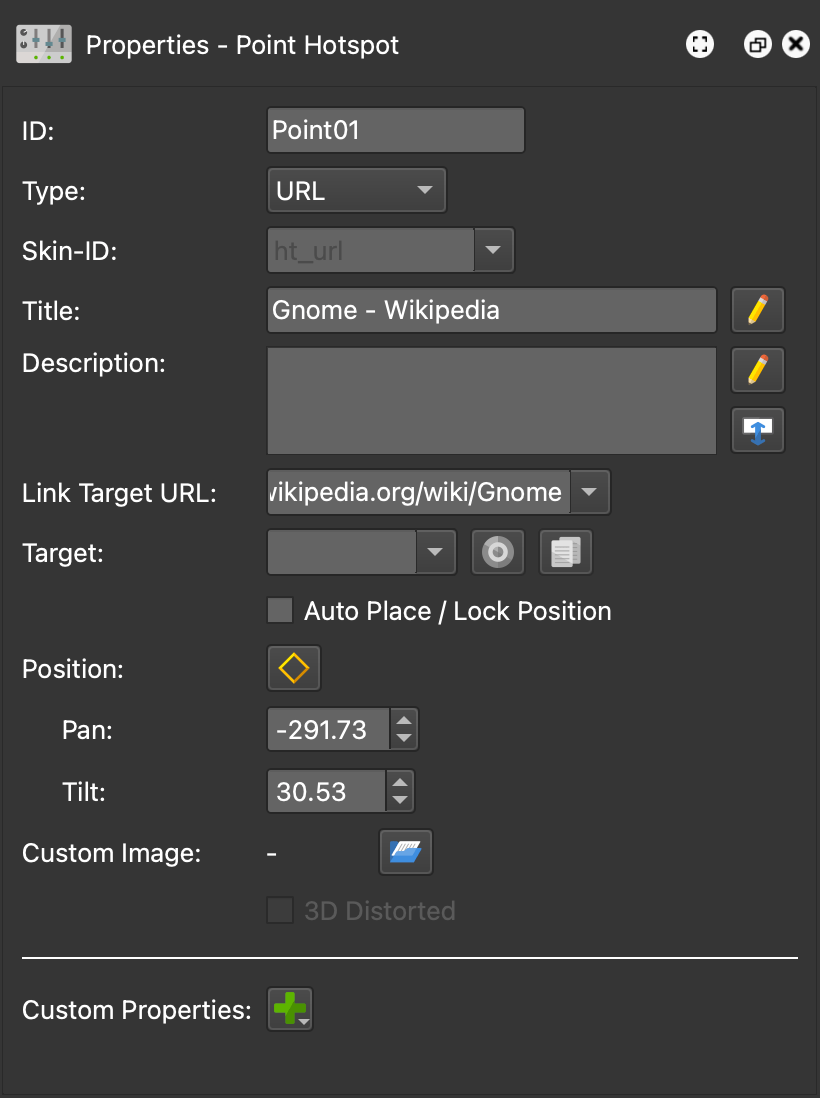
Add a URL-type point hotspot.

Hotspot Settings for the URL-type Point Hotspot -
Open the Skin Editor to create a new skin using the Skin Editor button in the Toolbar. Or open an existing skin. Or edit the skin added in the Web Output.
-
Add a Point Hotspot Template to the skin.
-
Change its ID to
ht_url. -
Add an icon for Point Hotspot. For this exercise, we’re using an icon from the Venis icon set in the Components Toolbox.
-
Make the icon a child of the hotspot template.
-
In the position settings, set the Anchor to center.
-
Double-click on the word, Position to center the icon directly over the template.

Positioning the hotspot icon. -
Add a variable. Click in the Canvas to open the skin’s settings. Add a variable to the variable table:
- Name:
vis_popup - Type:
True/False - Init Value:
false
- Name:
-
Draw a large Text Box in the Canvas.
-
Change its ID to
url_popup. -
Position the text box in the center of the canvas: Choose, center, for the Anchor. Then double-click on Position to center the text box.
-
Change the value of Size from Pixels to Percent. Set the Width to
80and the Height to75. -
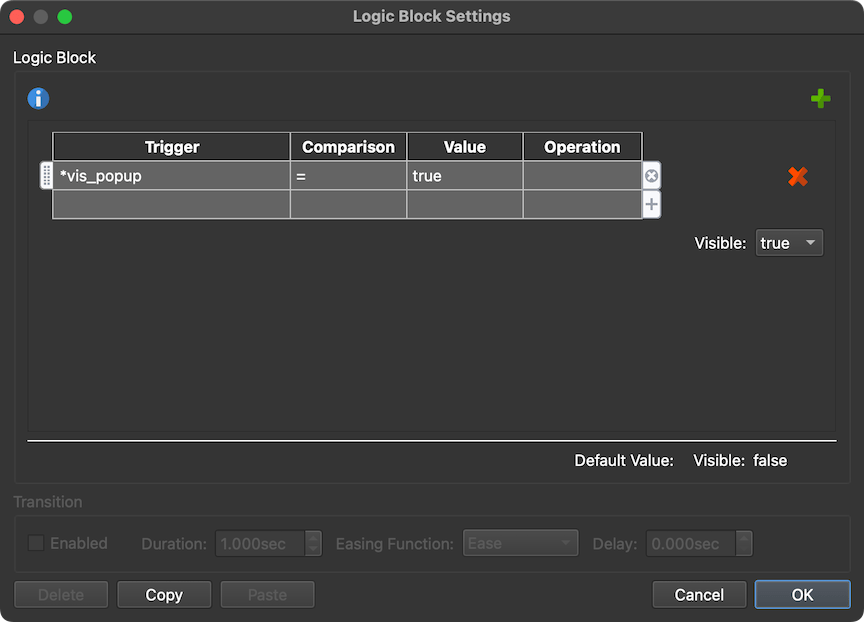
In the Appearance Settings, deselect Visible and add a Logic Block to show the popup only when the variable is true:
- Trigger = Variable >
vis_popup - Comparison =
= - Value =
true - Visible =
true

Logic Block added for Visible attribute.
- Trigger = Variable >
-
In the Rectangle settings, change the Background color, border width, radius, and color.
-
In the Text settings, remove the word, “text”.
-
Select the Point Hotspot Template and add action to load the website in an iframe and add it to the text box:
- Source = Mouse Click
- Action = Set Value
- Value =
<iframe src="$(hu)" style="border:0px #ffffff none;" name="kitchen" scrolling="yes" frameborder="1" marginheight="0px" marginwidth="0px" height="100%" width="100%" allowfullscreen></iframe> - Target =
url_popup
-
Add another action that changes the variable to true:
- Source = Mouse Click
- Action = Set Variable Value
- Variable Name:
vis_popup - Operation = Set(=)
- Value = true

The 2 actions needed to show the popup and to add the iframe to the text box
-
Save the skin and make sure it’s selected as the skin in the Web Output.

All other hotspot type popups are created similarly. Use the built-in the hotspot components as examples.