Menu Bar
In the menu bar, you'll find more tools and shortcuts. The menu bar also changes for the Skin Editor.
File
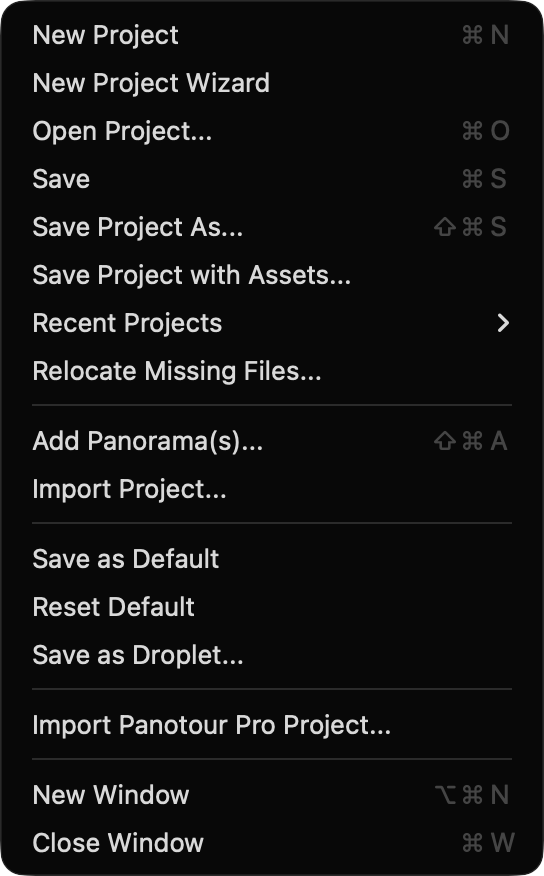
New Project – Opens a new project window. If a project window is already open and not saved, you’ll be prompted to save the project. That project will close before opening a new project window. Open Project… – Open a saved project.
Save – Save the project file.
Save Project As… – Save the project with a different name.
Save Project with Assets – Saves the project and consolidates all associated assets in a new location. You will be asked to save the project. You must save the project to a different folder than the original project.
Recent Projects – Choose from the most recently opened projects.
Relocate Missing Files… – Open the dialog to relocate missing files within the project.
Add Panorama(s)… – Import panoramas to the project.
Add Project – Select to add a Pano2VR project file (.p2vr) to the current project. Custom maps and floor plans will also be added along with all node settings.
Save as Default – Saves your project preferences as the default. Patches and user data will also be saved and added to a project with more than one node. To change the patch and user data, edit the Master Node.
Reset Default – Resets the default preferences.
Save as Droplet – Save your project and preferences as a droplet onto your desktop for quick image batch converting.
Import Panotour Project… – Import a Panotour Pro project. Learn more about importing PTP projects.
New Window – Opens a project window without closing any previous open project. This allows you to have multiple project windows at a time. Mac only
Close Window – Closes foremost open project window. Mac only
Edit
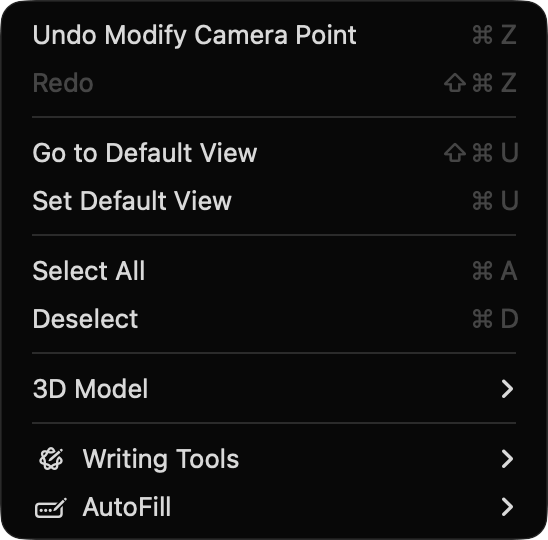
Undo – Undo last action.
Redo – Redo last action.
Go to Default View – Sets panorama to its default view.
Set Default View – Sets the default view.
Select All – Selects all images in the Tour Browser.
Deselect – Deselect any selected nodes in the Tour Browser.
3D Model
Camera Points – Change to Camera Points mode in the Viewer.
Manipulate 3D Model – Change to Manipulate 3D model mode in the Viewer.
Select Mode – Change to Select Mode in the Viewer.
Move Mode – Change to Move Mode in the Viewer
Rotate Mode – Change to Rotate Mode in the Viewer.
Scale Mode – Change to Scale Mode in the Viewer.
Link Mode – Change to Link Mode in the Viewer.
Toggle World/Local Space – Change the transform coordinate space.
Toggle Rotation Snapping – Toggle snapping 45º when in rotation mode.
Camera Modes – Switch camera modes:
-
Orbit – Move around the model as if it were floating in front of you. You can rotate the view, zoom in and out, and explore the model from any angle. Dragging with the middle mouse button pressed, or the left mouse button while simultaneously holding the Option/Alt key, lets you pan the model.
-
Walk – Keep your view at ground level and move naturally through the model, as if you were walking inside it. The camera follows the model’s floor and boundaries to prevent you from “falling through” if the Toggle Collisions setting is turned on.
-
Fly – Move freely through 3D space, similar to flying with no gravity. You can move up, down, and in any direction. Good for exploring large or open models.
-
Fly Over – Move above and around the model like a helicopter. The camera stays level to the horizon and at a constant distance from the ground while flying over the scene. Dragging with the middle mouse button pressed, or the left mouse button while simultaneously holding the Option/Alt key, temporarily switches to Orbit Mode.
Capture Preview Image – Capture the current view of the model in the Viewer. This will set the thumbnail image in the Tour Browser and, when exporting, include the captured image in the output folder.
Capture Project Custom Preview Image – Capture the current Viewer image and save it as <projectFile>-preview.jpg in the project folder. This file will be used as the project’s preview.jpg (Custom Preview) for web outputs and in integrations such as the WordPress plugin. Works for both panorama and 3D model nodes; set the Viewer to the exact view you want before capturing.
Capture Target Camera – Adds a target camera. Move to the desired view in the 3D Model, and then choose Capture Target Camera. See the glossary entry for Target Camera.
Elements
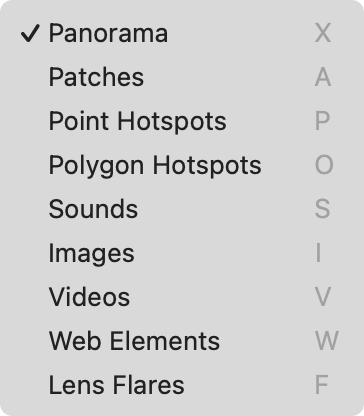
Each of these options will change the Viewer Mode. Panorama is the Viewer’s default mode.
-
Panorama – The Viewer’s default mode for viewing 360° panoramas.
-
Patches – Visual overlays or corrections applied to the panorama or model.
-
Point Hotspots – Interactive points placed on the panorama to show info or link to other nodes.
-
Polygon Hotspots – Interactive area hotspots placed on the panorama to show info or link to other nodes.
-
Sounds – Audio elements attached to the panorama.
-
Images – Static image elements pinned to the panorama.
-
Videos – Video elements pinned to the panorama.
-
Web Elements – Embedded HTML pinned to the panorama.
-
Lens Flares – Visual lens flare effects to simulate light artifacts.
-
Control Points – Markers used for alignment, stitching adjustments, or camera-point references.
Tools
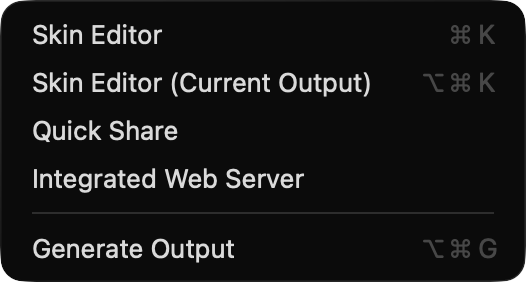
Skin Editor – Opens the Skin Editor.
Skin Editor (Current Output) – Opens the skin that is currently set in the Web Output.
Quick Share – Export the current panorama as a flat panorama with embedded metatags that are needed for sharing on social platforms (i.e. Facebook). The exported panorama will apply the default view so it is centered. If viewing limits have been applied, the image will be cropped to those limits.
Integrated Web Server – Opens the Integrated Web Server for simplified local testing.
Generate Output – Generate the output without having to open the output panel. Use the keyboard shortcut Ctrl-Alt-G (Windows) or Opt-Cmd-G (macOS). This will always generate the current output.
Tour
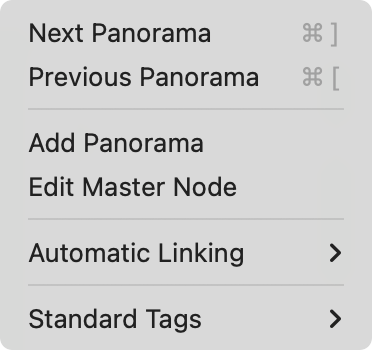
Next Panorama – Go to the next panorama.
Previous Panorama – Go to the previous panorama.
Add Panorama – Adds a panorama to the tour.
Edit Master Node – Choose this to edit the master node.
Automatic Linking – This will automatically link all panoramas in a tour (or those selected in the Tour Browser) based on the following options:
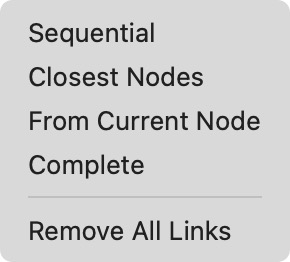
★ Images must be geotagged and their directions correctly set for automatic linking to work.
-
Sequential – The panoramas will be linked in their order in the Tour Browser.
-
Closest Nodes – The panoramas will be linked based on their closest neighbor based on GPS data. ✭ Suggested mode for uploading to Google Street View.
-
From Current Node – If a single node is selected/active, then links will be created to all other nodes in the project. If multiple nodes are selected, links will be created from the active node to all other selected nodes.
-
Complete – This links each panorama to every other panorama in the tour.
-
Remove All Links – Click to remove all point hotspot types that are a Tour Node. If multiple nodes are selected, the links between them will be removed. This is especially useful for trying out different Automatic Linking methods.
Standard Tags – These tags can be applied to nodes in the Tour Browser quickly using the assigned keyboard shortcut. The tags are set in the menu and saved in Pano2VR, making them available for every Pano2VR project.
- Create – Select to add tags to the menu.
- Delete – Select to remove tags from the list.

Standard Tags Menu

Animation
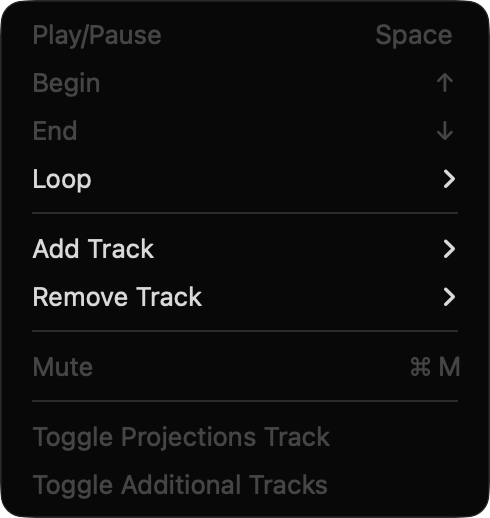
Play/Pause – Play or Pause the animation.
Begin – Go to the beginning of the animation.
End – Go to the end of the animation.
Loop – Choose from the following to loop playback:
- Current Clip – Only the current clip will be looped.
- All Clips – All clips will be looped.
- Off – Turn off looping.
Add Track – Adds a new additional track.
Remove Track – Removes an additional track.
Mute – Mute sound of video panoramas.
Toggle Projections Track – Hides or shows the projection track in the timeline.
Toggle Additional Tracks – Hides or shows all additional tracks in the timeline.
Cloud
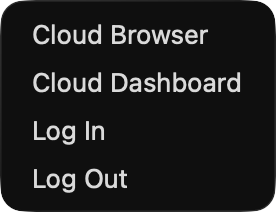
Cloud Browser – Opens the Gnome Cloud Browser.
Cloud Dashboard – Opens the Gnome Cloud Dashboard in the default web browser.
Log in – Log in to the Gnome Cloud. In the dialog, choose the method to log in. Web Browser will open a browser and prompt for log in credentials on ggnome.com. ggnome.com and gnome.cloud will prompt for a user name and password in the dialog.
Log out – Log out of the Gnome Cloud.
Window
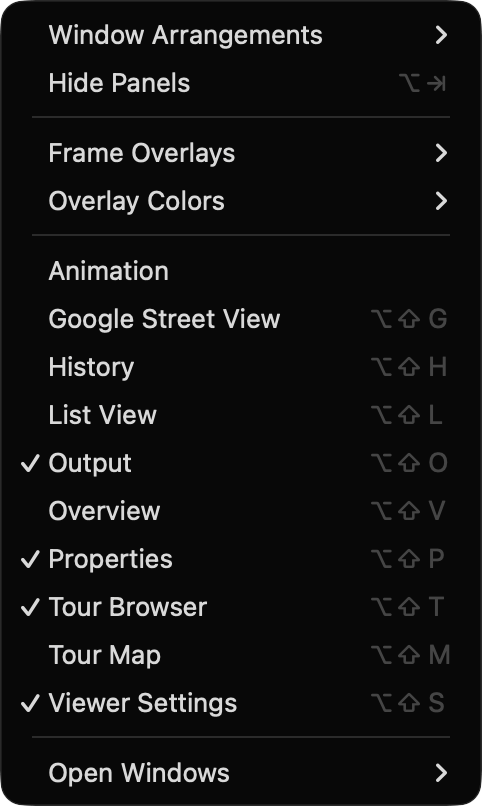
Window Arrangements –Saves your window layouts.
Hide/Show Panels – Hides or Shows all panels, to maximize the Main Viewer.
Frame Overlays – Adds an aspect ratio overlay so you can correctly frame the panorama.
-
16:9 – HD video
-
4:3 – SD video and still photography
-
None – Choose to remove the overlay.
✭ Once you add an output format (Web, Animation, Transformation), you will see the chosen output’s dimensions listed as option in the in the Frame Overlays menu.
Overlay Colors – Set the Viewer’s overlay color (viewer borders).
-
Black
-
Dark Gray
-
Medium Gray
-
Light Gray
Animation – Opens the Animation Editor
Google Street View – Opens the Google Street View Panel.
History – Opens the History panel.
List View – Opens a List View of all the elements added to the panorama.
Output – Opens the Output panel
Overview – Opens the Overview panel.
Properties – Opens the Properties panel.
Tour Browser – Opens the Tour Browser.
Tour Map – Opens the Tour Maps panel.
Viewer Settings – Opens the Viewer Settings panel.
Open Windows – Displays a list of all windows currently open. Choose one to bring it forward.
Help
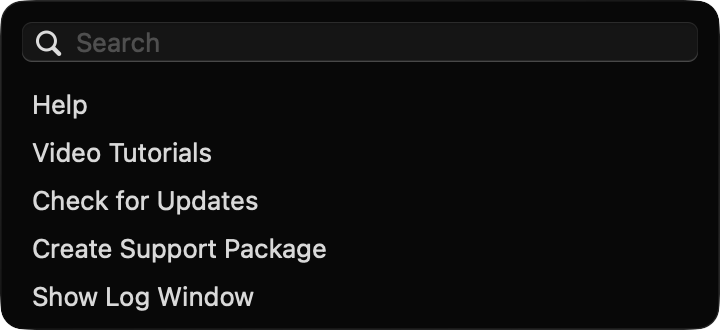
Help – Opens the Help pages (documentation).
Video Tutorials – Takes you to the video tutorials page.
Check for Updates – Choose to check for software updates.
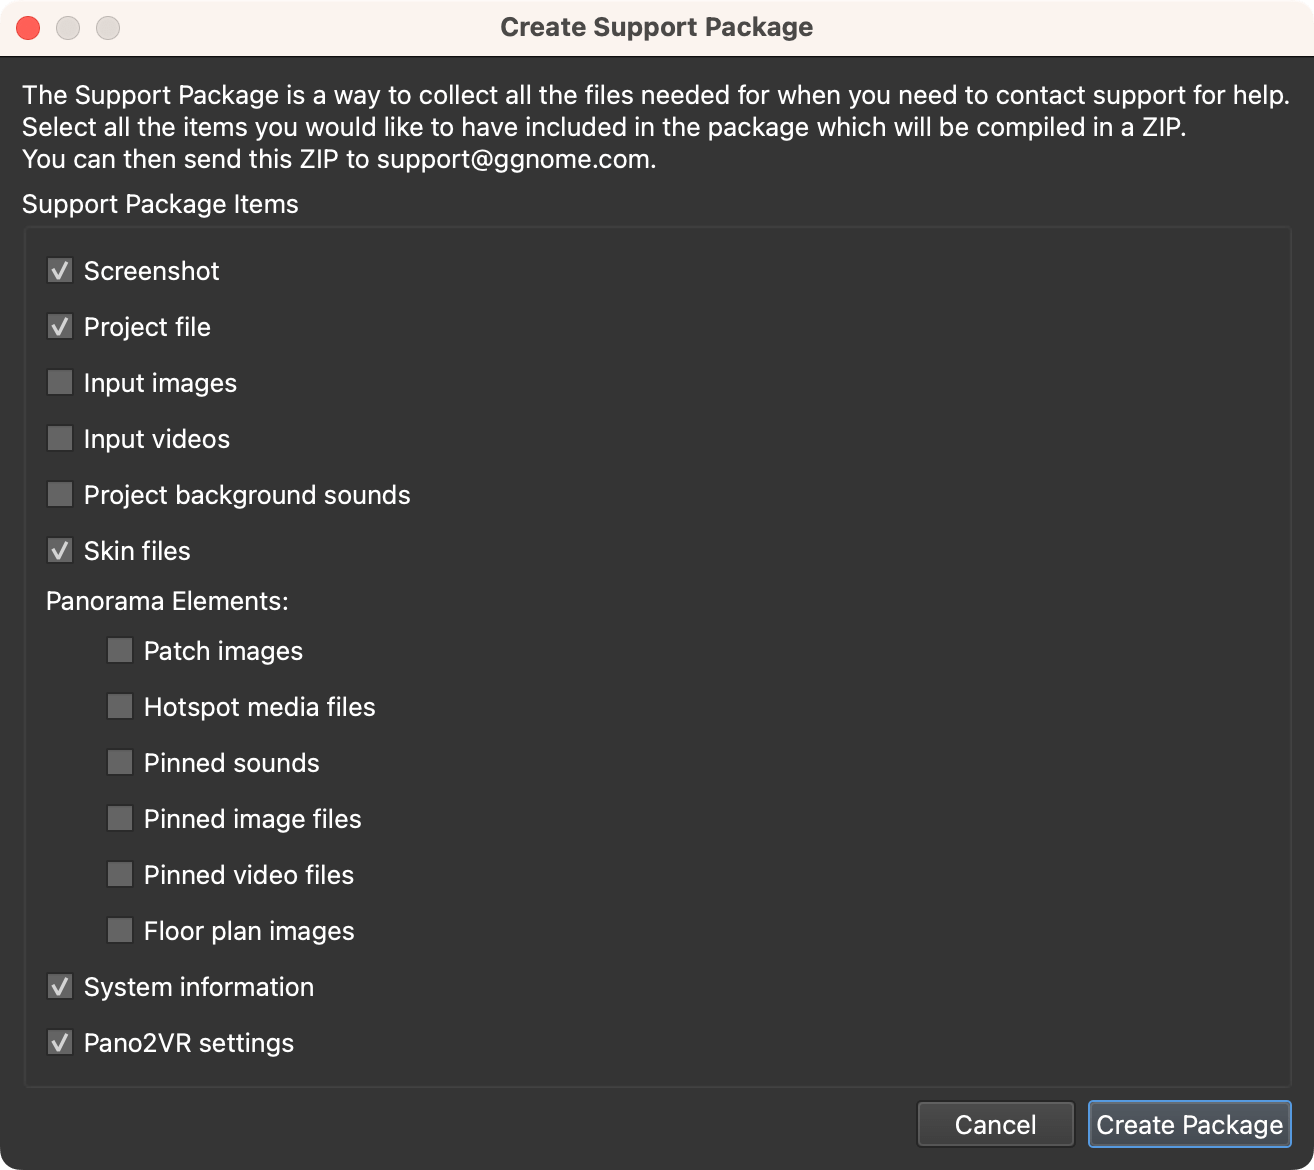
Create Support Package – If you require help and need to contact our support team, you can use this to collect all the files the support team would need to help you. Select the files needed, and hit, Create Package. Pano2VR will collect the files and package them in a ZIP, ready for sending to our support team. If you’re unsure what files to send, just stick with the default selection (Screenshot, Project file, Skin files, System information, Pano2VR settings).
About – Information about Pano2VR (On a Mac this is found under Pano2VR > About.)