Web Output
The web output exports all the files needed to add a tour to a website for playback in any modern web browser.

When the Web output is selected from the list of formats, the following settings will be visible. The properties for the web output will open in the properties panel.
Output Folder
All files associated with this output will be added to this folder unless otherwise specified. Its default name is output. Its default location is the same folder as the source image.
-
You can change the output folder’s location by clicking the folder icon and navigating to the new location.
-
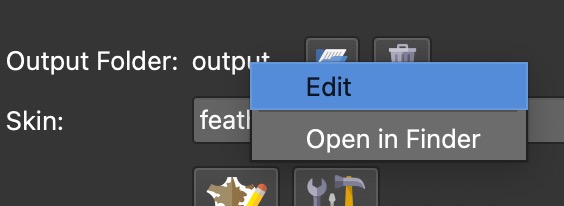
Right-click the folder name to change its name or to find the folder’s location in Finder [macos] or Explorer [win].

-
Each output will create a unique folder name to avoid overwriting previous outputs.
-
Erase Output Folder – Click the trashcan icon to erase all the content from the current output folder. Long press the button to choose to erase all the content except for the outputted tiles.
Skin
Here you can choose either one of the pre-installed skins or choose one that you have created in the Skin Editor. All skins saved to the default Skins folder will be listed in the menu. Otherwise, use the Open Skin button to add a skin or drag a skin file to the menu. If a skin is found in the same location as the source image, it will also be visible in the list preceded with $d: $d/myskin.ggsk
Right-click the skin file to locate it in Finder or Explorer.
The file extension used for skins is .ggsk (stands for Garden Gnome Skin).
Open Skin – Click this folder icon to navigate to a skin and add it to the output.
Edit Skin – Click this button to open the currently selected skin in the Skin Editor.
Edit Skin Configuration – Click to edit the initial values of exposed variables of the skin. This lets you configure skins to the needs of the current project.
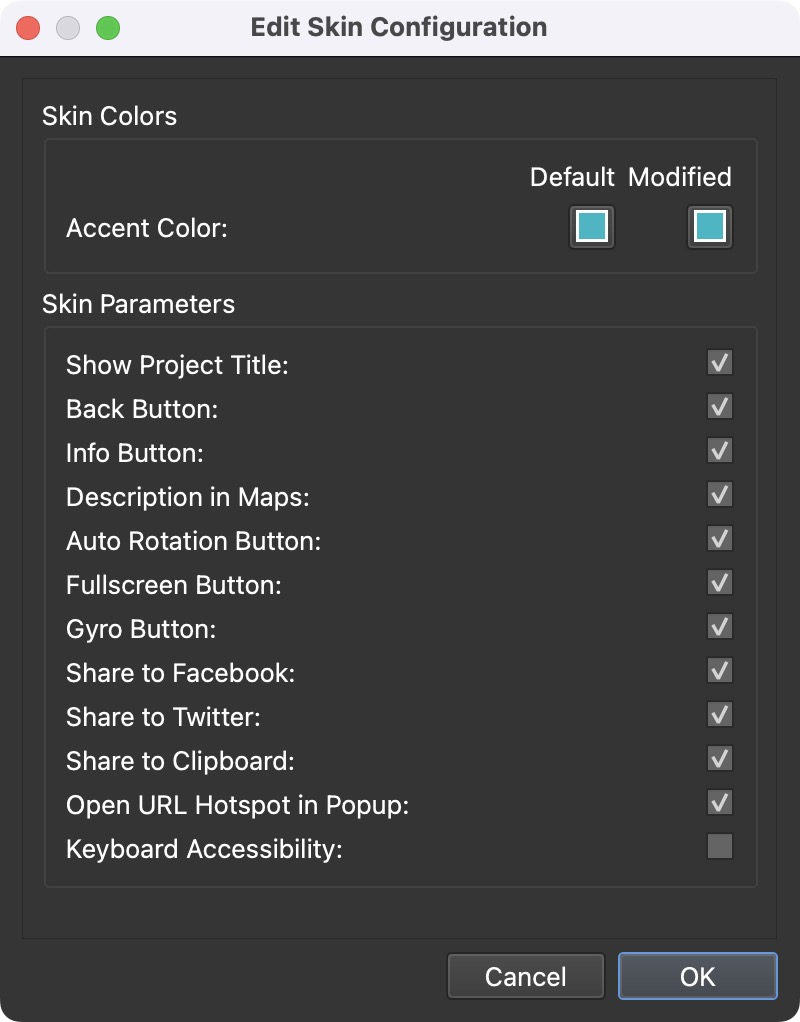
For example, if you have a skin that is frequently applied to projects but a certain element or component (like the Fullscreen button) is not always needed, a variable can be applied to that element’s Visible Logic Block. Then, you can change the variable’s value via the Skin Configuration.
Output
Generate Output – This button will generate the output. Keyboard shortcut: Command-Option-G [macos] or Control-Alt-G [win]. Alt-click [win] or Option-click [macos] to generate all outputs.
Open Output – Click this button to view the output (output must be created first) using the Integrated Web Server.
Generate Garden Gnome Package – Clicking this button will output the Garden Gnome Package format that is used for embedding panoramas in a CMS website.
Upload – Upload the project to Gnome Cloud.
Connection Status – The icon next to the Upload button indicates whether or not the project has been uploaded to Gnome Cloud and it is connected to the current project. Right-click this button to:
- Disconnect from Gnome Cloud – Disconnect the currect project from the uploaded version on Gnome Cloud.
- Select Gnome Cloud Account – Choose this option to switch to Gnome Cloud account that this output is connected to.
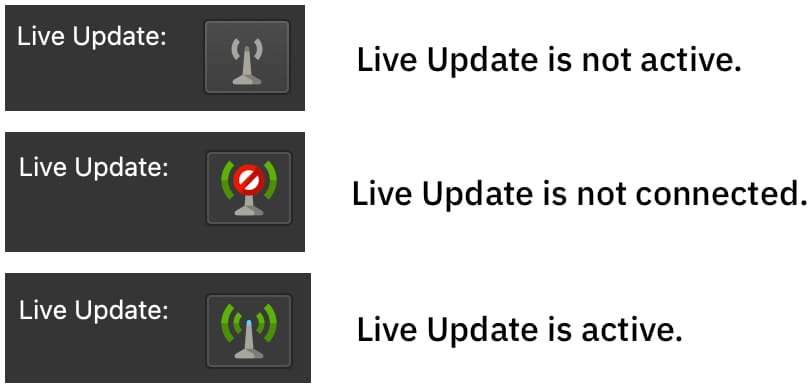
Live Update
Toggle Live Update on or off. When a web output is exported, the output is automatically opened in the default browser. When Live Update is active, every change to the project is updated live in the browser. This keeps you from having to manually export the project to see changes. Live Update will also update with every change in the skin. To keep Live Update on, but stop it from always updating when creating a skin, select Live Update on Save Only from the View menu in the Skin Editor.