Project Properties
The Project Properties contain settings for the entire project.
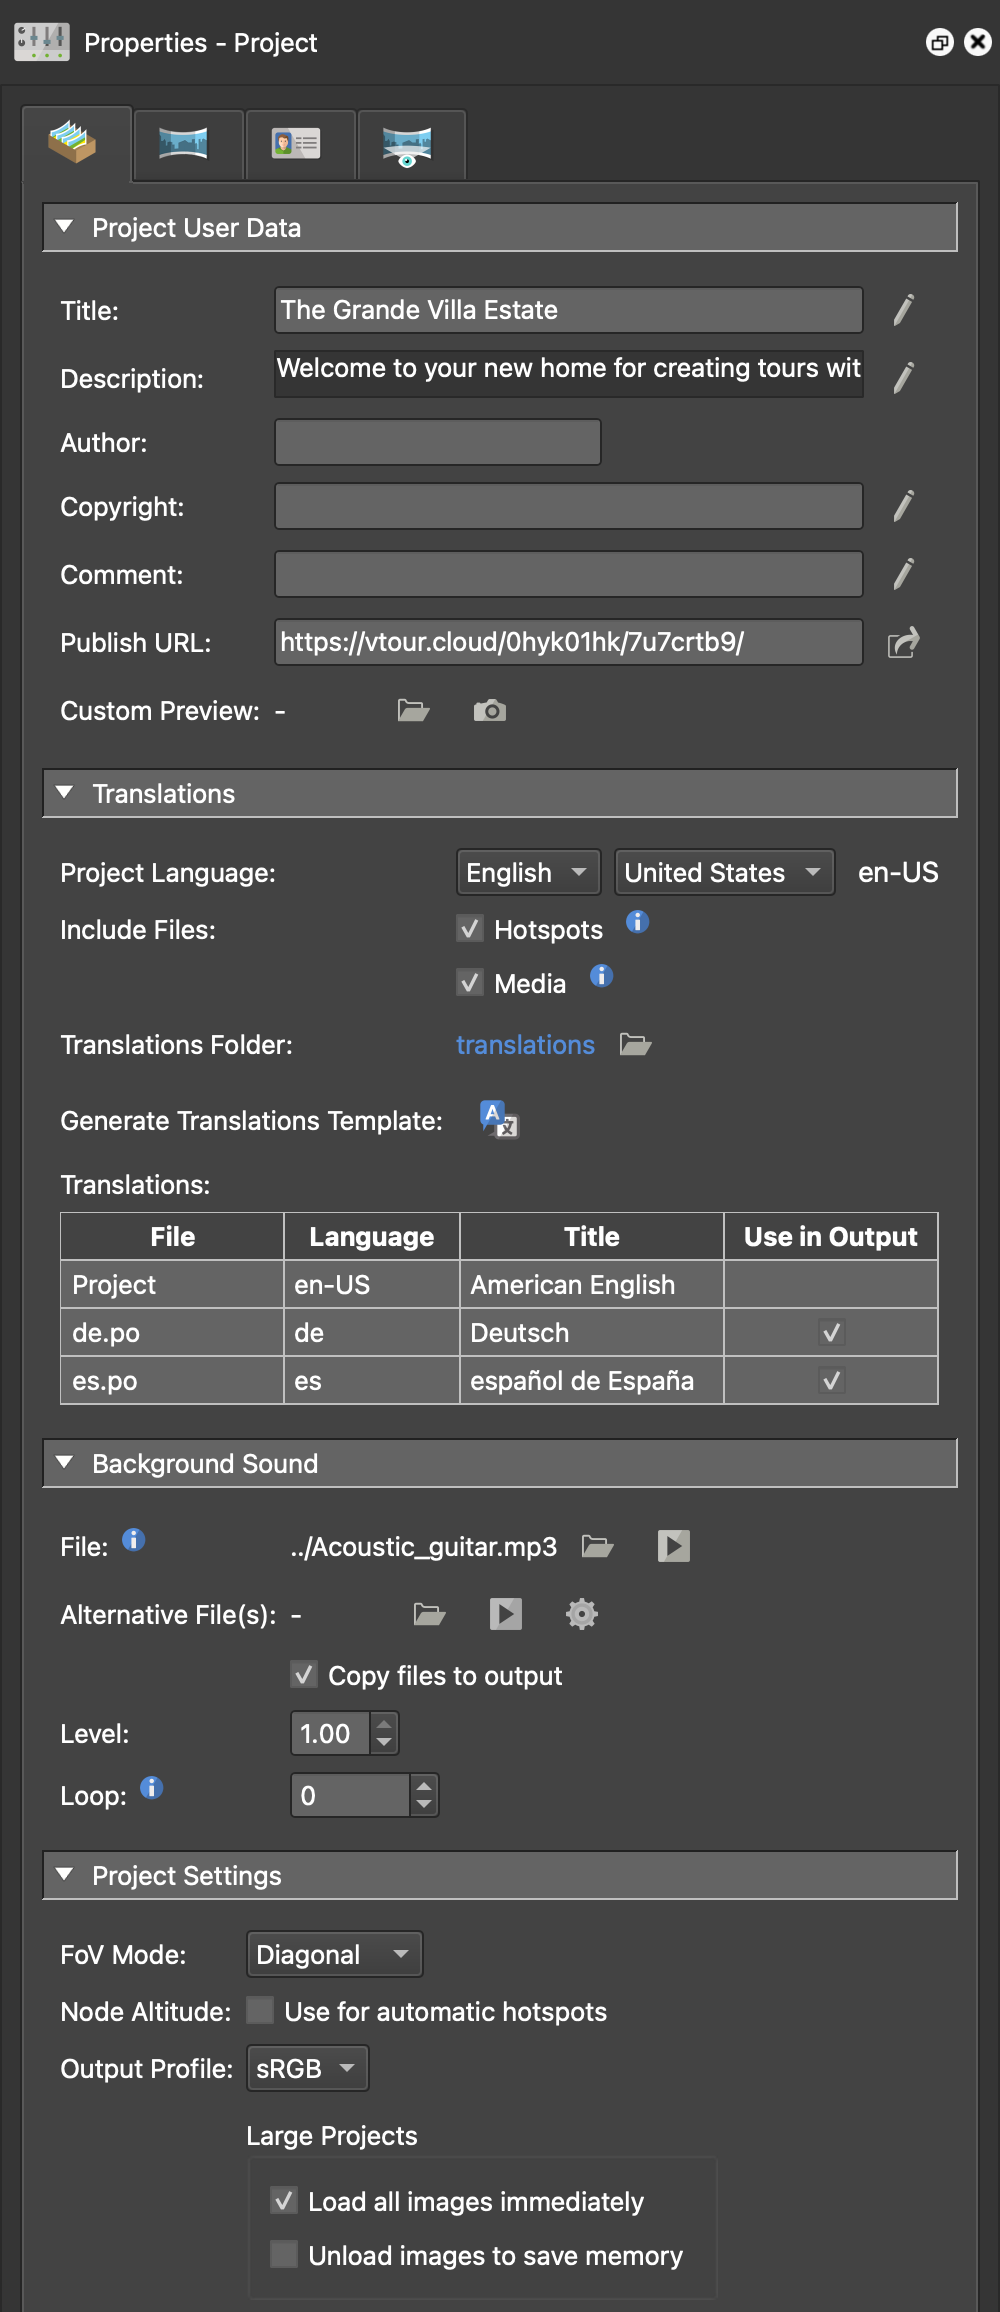
Project User Data
Project User Data is used for adding project-specific metadata. Each field has a corresponding placeholder that can be used in textboxes and as triggers in logic blocks.
Title – This title will be used for the HTML page’s title; the project
title. $(upt)
Description – Project description. $(upd)
Author – Project author. $(upa)
Copyright – Project copyright. $(upc)
Comment – Add a comment about the project. $(upo)
Click on the pencil icon to open a larger input field to enter more text.
Publish URL – The web address of the folder where you publish the tour, for
example https://example.com/tour/. When Pano2VR builds links from it, it adds
a missing trailing slash. The
Normal template uses this address to
build complete links for its social media meta tags, its
landing pages for search engines,
and sitemap.xml. When the project is uploaded to Gnome Cloud, the field is
filled with the project’s address automatically.
Click the share button next to the field to open the Share dialog, with the project link, an embed code for an iframe, and a QR code. The button becomes available once a URL has been entered.
Custom Preview – The web output includes a preview image (preview.jpg)
that is used as the project’s thumbnail (for example in the WordPress plugin).
When the template’s social media metadata is turned on, the output also includes
the cropped preview_social.jpg (1200 x 630 pixels) and preview_twitter.jpg
(1200 x 675 pixels) made from the same image. By default Pano2VR creates the
preview from the default view of the project’s start node, but you can override
it.
Set a custom preview in one of two ways:
-
Add an image file in the Custom Preview field. That image is used as the output’s
preview.jpg. -
Capture the current Viewer image by clicking the camera button or use the Capture Project Custom Preview Image command in the Edit menu or the Viewer’s context menu. This saves an image named
<projectFile>_preview.jpgto your project folder and uses it aspreview.jpgfor outputs.
The capture works for both panorama and 3D model nodes. Set the Viewer to the exact view you want before capturing.
Translations
Add translation files here to make your entire project multilingual.
Project Language – Choose the default project language from the first menu.
From the second menu, choose the region of the language or change it to <Main>
(found at the beginning of the list). The label next to the menus shows the
language code. If you are already familiar with language codes, you can add the
code here by double-clicking the language code.
Include Files – Select to include files in the translation. It’s possible that in your project, not every file or media needs to be included in the translation file, so here you can decide to exclude them.
-
Hotspots – Deselect to exclude any media and URLs added to hotspots from the translation files. This includes YouTube and Video URLs, images, videos, PDF files, and URLs.
-
Media – Deselect to exclude any media and URLs added to pinned elements from the translation files. This includes pinned sounds, videos, images, PDF files, web element code, and background sounds.
Translations Folder – This is the location of the translations files. To choose a new location, click the folder icon. To change the folder name or view its location, right-click.
Generate Translations Template – Click this button to create a template for translations.
Translations – This is a table of all translations that exist in the project. Translations here correspond to .po files in the translations folder. You can change the Title of the language and you can choose to exclude translations from the output. The translations added here will also show in the Set Language action in the Skin Editor.
Background Sound
Here you can add a single background sound that will play in the background of the entire project. If a node already has a background sound, the project background sound will not play.
The background sound is assigned with the ID of _background which can be used
as a target for an action in the Skin Editor.
Many browsers do not allow sound to initially play back. Therefore, you’ll need to add a button in the skin that has the action, Start Autoplay Media, to start playback of the project sounds.
File – Add the audio file here by doing one of the following:
- Drag the file to File.
- Click the folder button and navigate to your sound file.
✭ Click the play button to preview the audio. To remove the background sound, right-click on the filename and choose Clear.
Alternative File(s) – Use this to add alternative file formats of the main file in File to ensure playback in all browsers. Up to three alternative files can be added; another field appears as soon as the previous one is filled. Click the gear button to generate an alternative file directly in Pano2VR.
This is especially necessary for the web output since not all browsers support all audio and video codecs. For example, Safari supports MP3. However, as of this writing, Firefox does not but does support OGG. If the first file is not supported by the browser, the Alternative File will be used.
Learn about creating alternative files.
Copy files to output – Select to copy the sound files to the output folder when exporting. If deselected, the output references the files at their original location.
Level – The output level of the sound. Maximum is 100% or 1.00 while the minimum is 0. ★ Note that not all browsers will play the volume at the same loudness level. For example, if the level is set to 30% it may sound louder or softer across browsers.
Loop – Choose how many times the sound file will repeat or loop. ★ Tip: If you do not want the sound to begin at start up, choose a loop value of -1. You will then need to add a button in the Skin Editor to activate it. For an endless loop, use 0.
Project Settings
FoV Mode – This setting ensures that image boundaries stay true to the image’s window or scaling option. When the window size is changed, the image is scaled accordingly.
-
Vertical – When the image is scaled or window resized, the vertical field of view will stay true.
-
Horizontal – Choose this option to ensure the horizontal field of view is most important and is always visible when scaling the image.
-
Diagonal – If the diagonal of the image is most important and should stay within the image’s frame, choose this option. (Default setting)
Node Altitude – Select, Use for automatic hotspots to apply altitude to ghost hotspots and auto-placed hotspots both in the Viewer and in the output. This setting is applied to the entire project, not just the current node. This calculates the distance between the current node and the hotspot node and returns the distance that is the direct line between the nodes’ altitude.
Output Profile – Choose the color profile for the exported images.
-
sRGB – Convert the output images to the sRGB color profile. (Default setting)
-
P3 – Convert the output images to the wide-gamut Display P3 color profile.
-
Keep – Keep the color profile of the source images; no conversion is applied.
Large Projects – These settings control how images are loaded to help manage memory in projects with many nodes.
-
Load all images immediately – When selected, all node images are loaded as soon as the project is opened. Deselect this to load images only when a node is opened in the Viewer. This option is selected by default.
-
Unload images to save memory – Select to unload the images of nodes that are not currently open in the Viewer. This option is unselected by default.