List View
The List View panel lists all elements of the current node and the master node, so you can find, reorder, copy, and delete them.
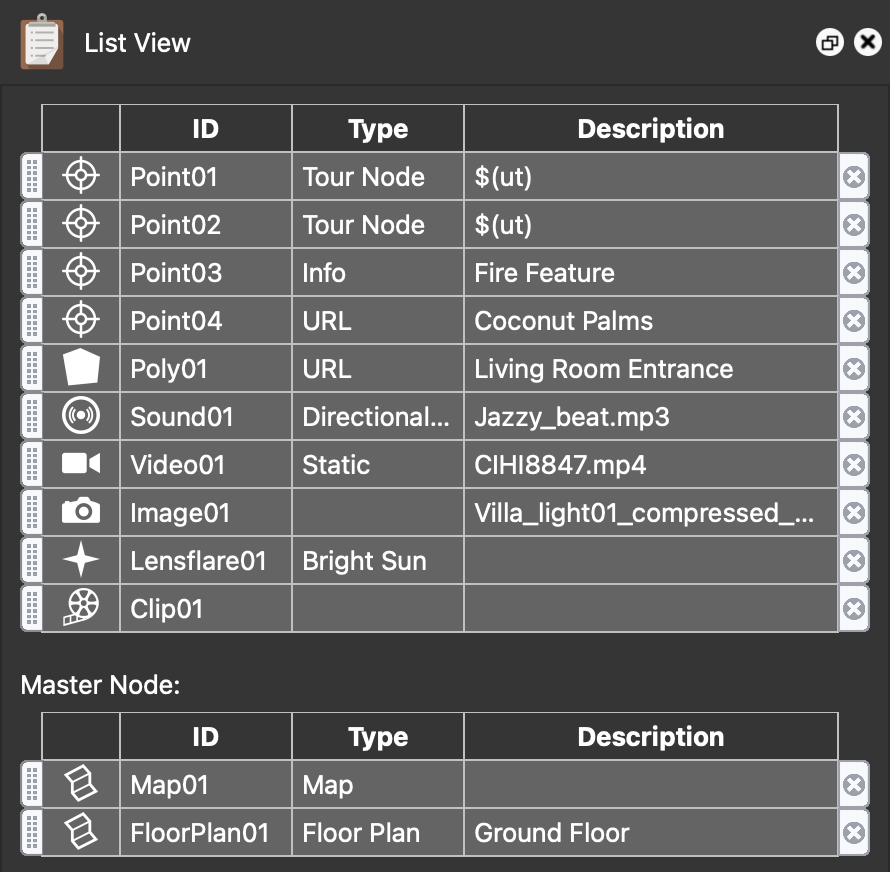
Open the List View from the Window menu or the Toolbar, or press Option-Shift-L on macOS or Alt+Shift+L on Windows. It lists the elements added to the current node: patches, hotspots, sounds, images, videos, web elements, and lens flares, each with the icon of its Viewer mode. Clips created in the Animation Editor and camera points of 3D model nodes are listed as well.
ID – Every element is assigned a unique ID that can be used in the Skin Editor. Animation clips show their clip title here, and tour node camera points show the name of the node they point to.
Type – The kind of element, for example whether a patch is an image or a mirror ball, or which lens flare type is used. For point hotspots, this column shows the hotspot’s skin ID if one is set, and otherwise the link type. Maps show Map or Floor Plan, and fly-in and video panorama clips show Fly In or Video Panorama. Node hotspots that are auto-placed using GPS data show a lock icon in this column.
Description – Information about the element, such as the hotspot title, the media file name, or the map title.
Drag the dividers in the header to resize the columns. Hover the pointer over any row for more information about that element, such as a hotspot’s skin ID.
Master Node
If elements (hotspots, patches, and so on) have been added to the Master Node, they’re shown below the main list, under Master Node, in a list of their own. The maps of the Tour Map are listed there too.
Working in List View
You can use the list to locate viewer elements, change the list order, and copy hotspots. If a Tour Node hotspot has been added, hover the pointer over the item in the list and the node that it links to is highlighted in yellow in the Tour Browser.
There is a layering order in list view. Elements at the top of the list or the group are further back, closer to the panorama, while anything at the bottom of the list is in front. If an element is covering another element, move that element above it.
Find an Element in the Viewer
You can use the List View to find any element added to the Viewer (hotspots, sounds, lens flares, and so on). Double-click an element to bring it into view and make it active in the Viewer. Double-clicking an element of the master node switches the Viewer to editing the master node.
Remove an Element
Click the × on the right side of a row to delete the element. For a viewer element, this removes it from both the list and the Viewer; for a map, it removes the map from the project, and for a clip, it removes the clip. The Default View camera point can’t be deleted.
Organize the List
Rearrange list items by dragging the handles on the left. When you have multiple patches, for instance, this changes their layering.
To move several elements at once, select them and drag the handle of one of the selected rows. All selected elements of that kind move together and keep their order. List items are grouped by type, and the types can’t be mixed: if there are point hotspots and patches, for example, you can reorganize the patches, but you can’t move a patch between point hotspots. Sounds, images, videos, and web elements are separate groups. Clips, maps, and camera points can’t be rearranged.
Navigate Hotspots
You can also use the List View to move through your tour: Option-click (macOS) or Alt+click (Windows) a Tour Node hotspot to go to the node it points to.
Hover the pointer over the list item to get an overview of the target node.
Copy, Paste, Delete, and Move List Items
Select one item, or Shift-click or Command-click (macOS, Ctrl+click on Windows) to select several. Then right-click and choose:
- Copy
- Paste (available after you’ve copied elements)
- Delete
You can also use the standard keyboard shortcuts to copy and paste, and press Delete or Backspace to delete the selected elements.
Copied elements can be pasted in both the List View and the Viewer. They’re pasted into all nodes selected in the Tour Browser, or into the master node when you paste in its list or while you’re editing it. Maps and camera points can’t be copied to other nodes.
In the main list, choose Move to Master Node to move an element to the master node. This is useful for adding patches to a tour. This option is not available for clips, maps, and camera points. If a selection includes them, they stay where they are and only the other elements are moved.
Copy Hotspots
You can copy hotspots from one node to another. Choose Copy from the shortcut menu, then select the node (or several nodes) in the Tour Browser you’d like to copy them to. Then, in the List View or in the Viewer, right-click and choose Paste.