Skin Editor Tree
The Tree supports a parent-child layering organization. An element treated as a parent will have a child or children that is/are "connected" to it, making it easier to group the elements and move them together in the canvas. The layering of the elements is like Photoshop; the top-most element is the front-most layer.
Right-click an element in the Tree to open its shortcut menu:
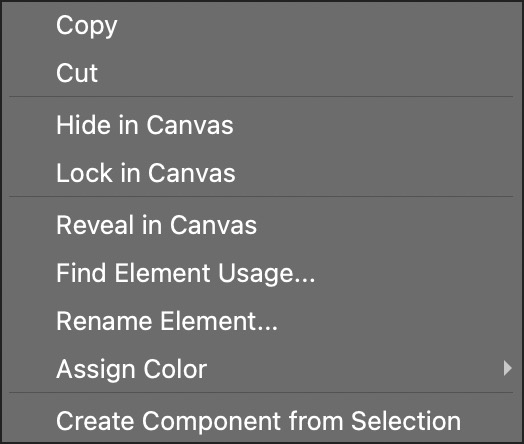
- Copy – Copy the selected elements.
- Cut – Cut the selected elements.
- Hide in Canvas – Keep the element from being visible in the Canvas. Note this does not hide the element on output.
- Lock in Canvas – Lock the element in place in the Canvas.
- Reveal in Canvas – Find the element in the Canvas.
- Find Element Usage… – Finds all aspects in which the element is being used throughout the skin.
- Rename Element… – Opens the skin search to rename the element.
- Assign Color – Assign the element a color for easier navigation in the Tree. The Color Filter shows only the elements with a given color.
- Paste Element – Paste the copied or cut elements as children of the element you right-clicked. Pasted elements get unique IDs where needed, and variables they use are added to the skin if it doesn’t have them yet. When the clipboard holds actions or modifiers instead, this entry reads Paste Actions or Paste Modifiers and adds them to the selected elements. The entry only appears when there is something to paste.
- Delete All Actions – Remove all the actions of the selected elements. Only shown when they have actions.
- Delete All Modifiers – Remove all the modifiers of the selected elements. Only shown when they have modifiers.
- Expand Element – Available for Scroll Area and Cloner elements. Opens the expanded view of the element in the Canvas.
- Create Component from Selection – Create a component from the selected elements. When you update an existing component, press and hold Option (macOS) or Alt (Windows) while you choose this command to keep the component’s preview image.
Filter the Tree
In a large skin, the toolbar at the top of the Tree helps you find the elements you’re looking for:
-
Element Type Filter – Show only elements of the chosen type, for example all buttons or all hotspot templates. Choose All to show every type again.
-
Color Filter – Show only elements with the chosen color. Assign colors to elements with Assign Color in the shortcut menu.
-
Reset Filters – Reset both filters to show all elements again.
-
Collapse All – Collapse all elements in the Tree.
The two filters work together: with both set, the Tree shows only the elements of that type that also have that color. While a filter is active, the matching elements are listed without their parents, and the Tree is drawn with a highlighted border. Double-click an element in the filtered Tree, anywhere but on its ID, to reset the filters and reveal the element in the full Tree. Double-clicking the ID renames the element instead.
Add an element to the Tree
Do one of the following to add an element:
-
Click on a tool in the toolbar and then click in the Canvas. The new element is added to the top of the tree.
-
Drop an element (sound, image, button) into the Editor (canvas). The element is added to the top of the tree.
-
In the menu bar, choose the element type from the Elements menu, then click in the canvas. The new element is added to the top of the tree.
Each new element is automatically added to the top of the tree. Rearrange the elements by dragging them within the tree.
Make an element a parent (top level element)
To make an element which is a child of another element a top level element in the Tree, do one of the following:
-
Drag the element between two top level elements, wait for a thick black line to appear, and drop the element.
-
Drag the element to the top of the Tree, wait for a thick black line to appear, and drop the element.
-
Drag the element to the bottom of the Tree, wait for a thick black line to appear, and drop the element.
Make an element a child
Make an element a child of another element by doing one of the following:
-
Drag an element onto another element. The element will be indented under its parent element with a disclosure triangle to show and hide it in the Tree.
-
Right-click an element, choose Cut or Copy. Right-click the parent or top level element and choose Paste Element.
Select more than one element
Select elements in the Tree by doing one of the following:
-
Click the first element, then Shift-click the last element to select a range.
-
Command-click (macOS) or Ctrl+click (Windows) elements to select them individually.
Hide or lock an element or group of elements in the Canvas
To hide elements in the Canvas do any of the following:
-
Click the eye icon to the left of the element to hide it in the canvas.
To make an element invisible in the output, deselect Visible in its properties.
-
Right-click on the element or group of elements and choose Hide in Canvas.
-
Press Shift-Command-H (macOS) or Ctrl+Shift+H (Windows) to hide the selected elements.
-
Select a group of elements and click the eye icon to show or hide in the Canvas.
To lock an element do any of the following:
-
Option-click (macOS) or Alt+click (Windows) the eye icon to the left of the element.
-
Right-click on the element or group of elements and choose Lock in Canvas.
-
Press Command-L (macOS) or Ctrl+L (Windows) to lock the selected elements.
Edit an element
To edit an element:
- Right-click any element to cut, copy, paste, or lock it.
To edit an element’s ID:
- Double-click its ID to make it editable.
Condense the Tree
To condense the Tree, do any of the following:
-
Collapse the elements that are grouped by clicking the disclosure triangle to the left. Option-click (macOS) or Alt+click (Windows) a disclosure triangle to collapse or expand the element together with all of its child elements.
-
Click the Collapse All button in the Tree’s toolbar to collapse all elements.
-
Choose View > Compact Tree View to condense the tree.
Add Sound Files
Add sound files by doing one of the following:
-
Drag the sound file to the empty area of the tree.
-
Right-click the empty area below the elements and choose Add sound. The same shortcut menu has Paste Element when the clipboard holds elements.
-
In the menu bar, choose Elements > Add Sound….
Remove a sound by right-clicking it in the Tree and choosing Delete, or select it and press the Delete or Backspace key.
Keyboard Navigation
When the Tree has keyboard focus, use these keys to navigate:
-
Up Arrow and Down Arrow – Select the previous or next element.
-
Left Arrow and Right Arrow – Collapse or expand the active element.
-
Space bar – Open or close the active element.
-
Delete or Backspace – Delete the selected elements or the selected sound.
-
Tab – Move keyboard focus to the Canvas.
Show Elements in the Canvas
When zoomed in to the Canvas, it can be hard to find specific elements in the skin. To more easily navigate to an element, right-click on it in the Tree and choose Reveal in Canvas.
Warnings in Skin
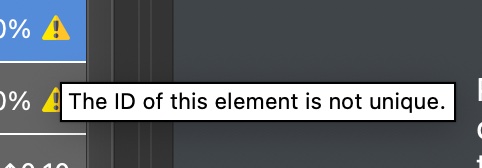
Warning symbols appear in the tree next to an element. Hover the mouse over it to see the warning. If a child element has a warning, and the parent element does not and is collapsed, the warning is visible at the parent level. To list every warning in the skin, choose Edit > Find Warnings….