Animation Output Properties
Once you've created the animation in the Animation Editor, you can then output it by choosing the Animation output from the Output Panel. Below are all the output settings for Animation.
Transitions
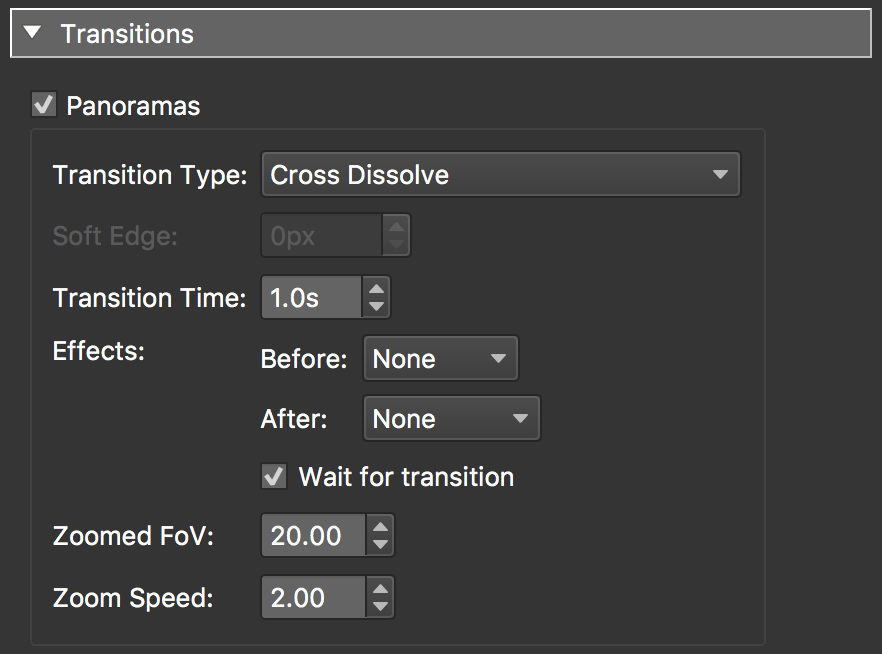
If your Animation has multiple clips, you can choose a transition for moving between them.
Panoramas
Select this to enable transitions.
Transition Type – Choose a type of transition:
- Cut
- Cross Dissolve (default)
- Dip to Color – Use the color picker to the right to choose a color to dip to.
- Iris Round from Center
- Iris Rectangular from Center
- Wipe from Left
- Wipe from Right
- Wipe from Top
- Wipe from Bottom
- Wipe Random
Soft Edge – The Iris and Wipe transitions can have a soft edge (feather). It defines how much the edge of the transition is blurred, in pixels.
Transition Time – The full time of the transition from one panorama to the next. The default is 1 second. The Cut transition has no transition time.
Effects – You can choose to have effects occur before and/or after the transition. Before offers Zoom In; After offers Zoom In and Zoom Out.
- Wait for transition – When selected, the After transition effect, will not occur until the transition is finished. When deselected, the effect will occur at the same time as the transition.
Zoom to FoV – Available when Zoom In is chosen as the Before effect. The field of view, in degrees, the last frame of a clip zooms in to before the transition starts. The default value is 20 degrees.
Zoom from FoV – Available when an After effect is selected. This is the field of view at which the next clip starts; from there it zooms to the field of view of the clip’s first keyframe. For Zoom In, choose a value between 70 and 160 degrees; for Zoom Out, between 0.01 and 110 degrees.
Zoom Speed – The speed of the zoom effect. The default is 2.0.
Animation
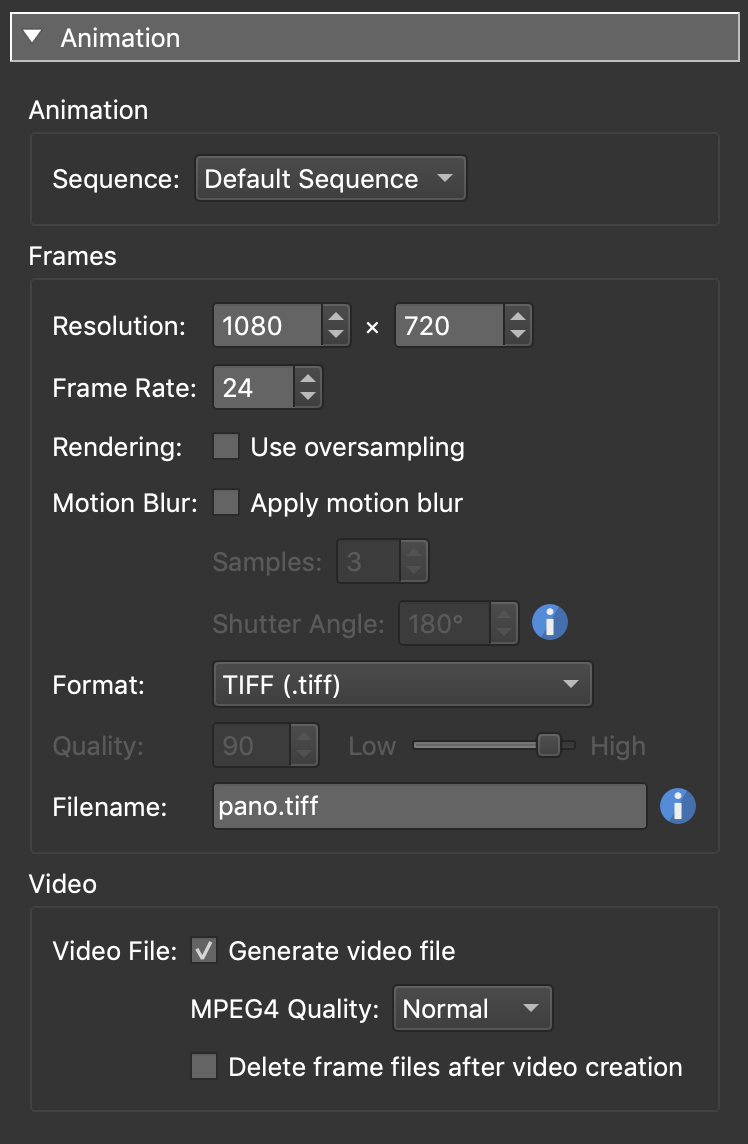
These are the movie settings. You can choose to output just a movie file or just an image sequence (frames) or both.
Animation
Sequence – Choose a sequence that has been created in the Animation Properties, to output. The automatically created sequence is listed as Default Sequence.
Clips that animate a 3D model node are not rendered in the animation output, because it can only render panoramas. They are left out, and when you generate the output, Pano2VR tells you which clips it skipped before it starts rendering.
Frames
Resolution – Define the video’s dimensions (width x height in pixels). Both the width and the height should be divisible by 8; if they are not, a warning icon appears. Click the warning icon to adjust the values automatically.
Frame Rate – Define the video’s frame rate. A frame rate of 60 will produce smooth results.
Rendering – Select Use oversampling for better image quality but at the cost of significantly increasing rendering time.
Motion Blur – Select Apply motion blur to apply motion blur to the video which will help to produce a smooth motion in the video.
-
Samples – Determine the number of samples to create. 3 is the default and should work well with most projects.
-
Shutter Angle – This will determine how much motion is recorded in each frame. The default is 180º and is a common setting. A larger angle would create more blur to point of smearing while a smaller angle would create a more stuttered motion.
Format – Select the file format of the frames. The default is TIFF. The menu lists the image formats Pano2VR can write, except the high dynamic range formats (Radiance HDR and OpenEXR), BigTIFF, and large Photoshop documents (PSB).
Format Settings – Additional settings appear depending on the selected format. For example, JPEG, WebP, and JPEG XL offer a Quality setting, JPEG XL adds an Effort setting, and TIFF offers a Compression setting (none, ZIP, JPEG, WebP, JPEG XL) with further options depending on the chosen compression.
Filename – This is the base name for the frames. The frame number is
appended to it for each frame of the animation. By default they are named pano
and will count up through the sequence, but you can change this to anything you
prefer.
Video
Video File – Select Generate video file to enable the video file output.
Pano2VR generates the video with the built-in Qt Multimedia encoder. Video output is available when the current media backend supports MP4 with H.264.
-
MPEG4 Quality – Select the video quality:
- Normal
- High
-
Include video panorama sound – Select to include the audio of video panoramas in the video. The audio plays during the clips of the video panorama nodes.
-
Include background sound – Select to include the project’s background sound and the background sounds of the animated nodes in the video. The sounds’ loop and level settings are applied.
-
Delete frame files after video creation – In order for the video to be created, each frame must first be generated. Select this option to delete the frames after the render is complete. It might be useful, however, to keep them.
Generate and Open the Animation
When you click Generate Output in the Output panel, a dialog asks what to render: all frames, all clips as separate videos, a single clip, or a range of frames. See Animation Output.
Click Open Output to play the video. If you also rendered clips as separate videos, the button opens a menu where you choose Main Animation or one of the clip videos.