Using Node Markers
Node markers are skin elements that can be used to indicate a node’s location on a floor plan, image, or map. Node Markers and Tags can be used in conjuction to activate actions and media.
Adding Node Markers
Follow these steps to use node markers to show a panorama’s location on a map image. This is helpful when the map is a floor plan or any other type of map that is not a street map. If you just want to use a map for showing image locations, simply add a map with the map button.
-
Create a tour.
-
Open the Skin Editor.
-
Add a markertemplate with custom images. The easiest way to do this is to add one of the components named, Map Pin with Radar. When you add this component, you’ll see a container called, hide_template. In that container is a Node Marker that has been made into a marker template (simply by changing the ID to markertemplate).
-
Add an External Image (your map) to the skin. This is where the node markers will be placed.
-
Drag nodes from the Tour Browser to their location on the map in the skin editor. A node marker will be added. The marker image and text comes from the markertemplate. If you used the Map Pin with Radar component, then the marker will use these images. If you want to use your own icons/images, then go to the next secion.
-
Save the skin.
-
Output the project.
Have multiple locations and maps? Move on to, Using multiple node images.
Universally Change All Marker Images
The template’s images can be changed at anytime. If the node markers from the marker template have already been added, this will universally change all marker images.
-
In the Skin Editor, select either one of the template marker images (marker_active or marker_normal).
-
Expand the SVG Image panel and select Change next to the image, and navigate to the new image file. Choose, Open.
Now, all the node marker images will have changed.
Using Multiple Node Images
It is sometimes necessary to use different marker images for a different set of panoramas. For this example, we will use different images for different locations/maps.
These steps are a continuation of Adding Node Markers.
-
Add a another map/image to the skin.
-
Drag the images that will be used for the marker on to the canvas; one for the active state and one for the normal state.
-
Give the images meaningful IDs in the Position panel.
-
Make the images children of the container called, hide_template, by dragging them onto the container.
-
Select the markertemplate and expand the Node Marker pane. Then, select the new images for the following:
-
Clone as Normal
-
Close as Active
-
-
Now drag in the new panoramas/nodes for which these image will be used.
The new panoramas should now be using the new marker images.
Activating Elements
The node markers can be used to activate elements within the skin based on triggers. This example will illustrate how to show and hide buttons based on tags. This way, you can use the power of node markers for non-pro projects, too.
-
For each panorama that will trigger a change, add a tag in the user data panel. Our example adds the tag, sound to every panorama that has sound added to it.
-
In the Skin Editor, add an element that will be triggered by the tags added in the previous step. We added play and pause buttons to our controller.
-
In the element’s Appearance panel, deselect Visible, to keep it hidden until it is triggered. (Otherwise, it will show on start up.)
-
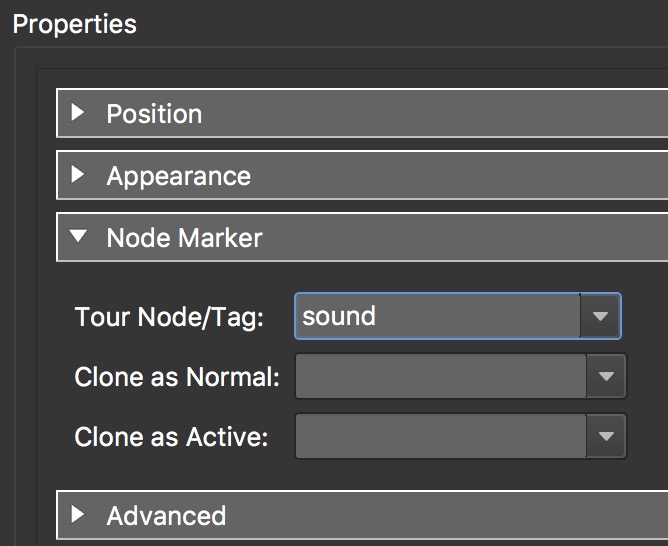
Add a new node marker.
-
Expand the Node Marker panel, and in the Tour Node/Tag section, add the tag (type in or drag tag from User Data panel) that was added to the panorama. In our example, we added our sound tag.

-
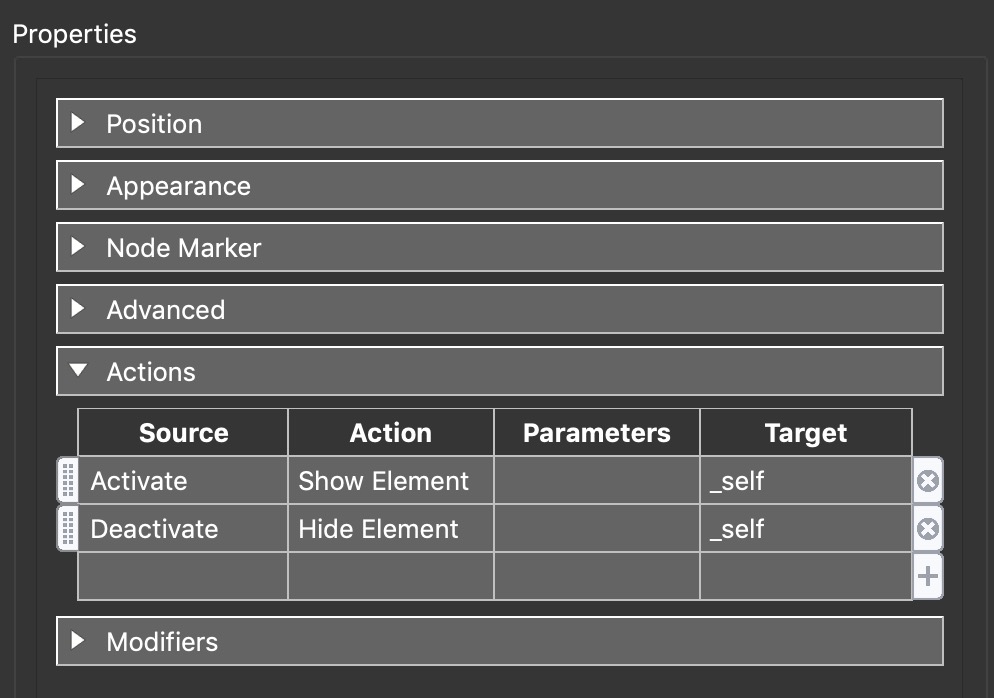
In the Actions pane, add the following actions:
-
Source: Activate; Action: Visibility/Show Element; Target: Play button
-
Source: Deactivate; Action: Visibility/Hide Element; Target: Play button
-
-
Save the skin and output the project.
Show the Hotspot’s Tooltip on the Map
It can be useful to also show the node’s title (or hotspot tooltip) in the map. One way to do this is to show the node’s title both in the map and at the hotspot.
You can see this being applied in this tutorial for the Map Pin Component:
You can simply copy the Map Pin with Radar’s component’s hide_template to get this function. Or you can implement it yourself:
Add a logic block to the Visible parameter of the markertemplate’s text box:
| Trigger | Comparison | Value | Operation |
|---|---|---|---|
| Mouse Over Parent | = | true | Or |
| Mouse Over | = | true | |
| Visible = True |
This expression says: show the text when the mouse hover’s over its parent (markertemplate) or over itself.
Expand the Advanced pane and add {} to the Hotspot Proxy ID field.
Drag in a node to the map.
You’ll now see that map pin’s text box’s Hotspot Proxy ID populated with {node 1}(or whatever node you added).
Adding the curly brackets to the Hotspot Proxy ID has created a link between the skin and the hotspots. And instead of using a hotspot ID, you can use Node IDs.