Properties Panel
The Properties panel is where individual settings are set for the input image or video and for each of the Viewer Modes. The settings in the panel will change depending on which mode you are currently using.
The properties will adjust depending on the current element selected in the viewer.
The default panorama settings will appear when no pinned element is selected in the viewer and if a Map or Floor Plan has been added to the Tour Map and is active there, then the corresponding settings will appear for them.
Default
When working in the default Viewer Mode, Select, the following properties will be available:
Input Image
Type – You can either let Pano2VR figure out which type of image is being imported by choosing Auto, or you can select an image type from the menu:
Stereo Pair – This setting will appear if the image is a stereo panorama. Choose from Left/Right or Right/Left. Pano2VR will always show the Right side.
File – Either enter the file path to the image to be imported or simply click the button to navigate to and open the image.
Convert Input
Click to open the Convert Panorama options and change your image to a different image type, like cube faces. Learn how to convert images.
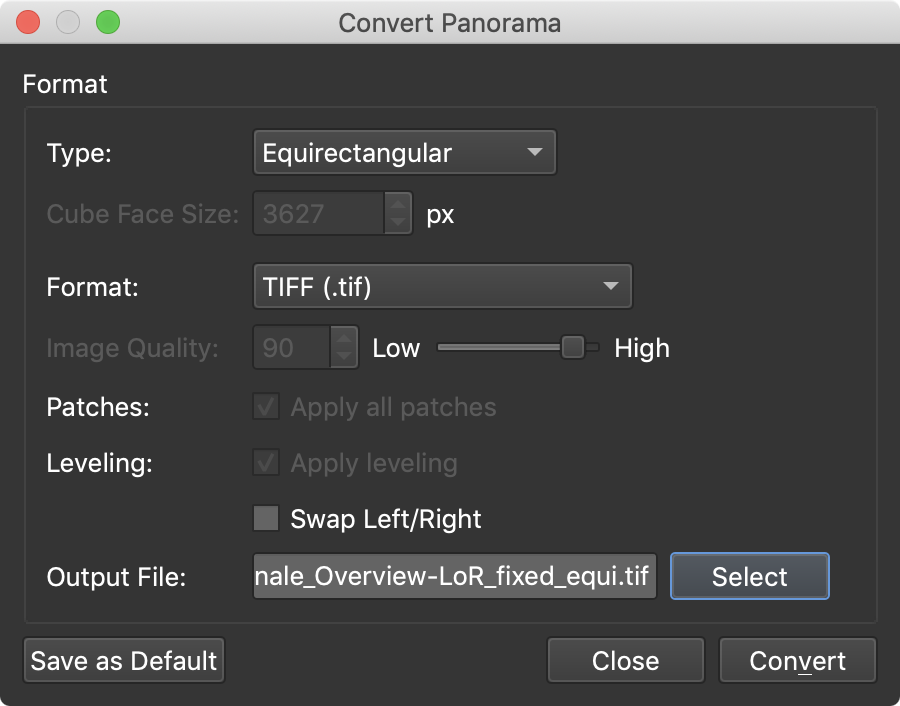
Type – Choose the image type to convert to.
Cube Face Size – If converting to Cube Faces, this will be enabled and you can set the size of the cube faces, or let Pano2VR set the size.
Format – Choose the image format to convert to. If you have a very large project with lots of nodes, we recommend converting all images to TIFF. Also, if you’re using a gigapixel image, we also recommend to convert it to BigTiff (if a PSB format) to make use of the tile TIFF format that Pano2VR uses. This will load the images much faster in Pano2VR.
Image Quality – When converting to JPEG, you can choose the image quality.
Patches – If you’ve added patches to the panorama, you can choose to include them during the conversion.
Leveling – If you’ve applied leveling to the panorama, you can choose to apply the leveling to the converted image.
Swap Left/Right – If you have a Left/Right Stereo image, select this to swap the right and left images if needed.
Output File – Name the converted file and choose a new location.
Save as Default – Click to save the current settings as the default. This is especially useful when there are many images to convert.
Input Video
Drag in a panoramic (360º) video to the Viewer, Tour Browser to add a 360º video or by clicking the folder and navigating to the file.
File – Click the folder to add a panoramic video (in the 3×2 format).
Alternative File(s) – Add alternate versions of the video. These could be different resolutions, for instance. The browser will play the first video in the list that is compatible.
Type – Choose the video format.
-
Video 3×2
-
Equirectangular (default)
Auto-start – This setting determines how the video will play back if a browser prevents play back if it has audio.
-
Start on load – Select this to start playing the video once it’s loaded. If deselected, the video panorama will not play when loaded and will need a way for the user to manually play the video back.
-
Start muted – Some browsers prevent video playback if there is audio. When this is selected, the video will play with the audio muted (audio will be turned on as soon as the user interacts with the panorama).
End Action – Choose what happens once the video ends:
-
Exit – The video will exit and the input image will be displayed.
-
Loop – The video will continuously play.
-
Stop – The video will stop after it is finished playing.
If more than one node (video or photo) has been added to the Tour Browser, you will be able to choose a Tour Node to go to when the video ends. You’ll then get the following Target View:
-
Default View – This will open the tour node at its Default View.
-
Current View – This opens the next node in the same view (pan, tilt, FoV) that is currently displayed in the Viewer.
-
Forward – This view requires GPS data so that it can point forward when moving from one node to the next. It will keep the same pan/tilt/FoV values while correcting for North so the direction is always looking forward.
-
Backward – This view requires GPS data so that it can point backward when moving from one node to the next. Just like with Forward It will keep the same pan/tilt/FoV values while correcting for North so the direction is always looking backward.
-
Specific View – Enter the Pan, Tilt, and Field of View values separated by slashes to set the opening view:
pan/tilt/fov.
Background Sound
Here you can add a single background sound. It will play in the background of the project.

The background sound is assigned with the ID of _background which can be used as a target for an action in the Skin Editor.
★ Background sounds do not work on iOS devices (HTML5) without a button to start and stop the sound. You can add a button for this in the Skin Editor.
In Pano2VR pro, use the Copy button to copy the background sound to all nodes in a tour. This is especially needed if direct node access is being used.
Filename – Add the audio file here by doing one of the following:
- Drag the file to Filename.
- Choose, Open and navigate to your sound file.
✭ Click the play button to preview the audio.
Alternative File – Use this to add an alternative file format of the main file in Filename to ensure playback in all browsers.
This is especially necessary for the HTML5 output since not all browsers support all audio and video codecs. For example, Safari supports MP3. However, as of this writing, Firefox does not but does support OGG. If the first file is not supported by the browser, the Alternative File will be used.
Learn about about creating alternative files.
Level – The output level of the sound. Maximum is 100% or 1.00 while the minimum is 0.
Loop – Choose how many times the sound file will repeat or loop.
★ Tip: If you do not want the sound to begin at start up, choose a loop value of -1. You will then need to add a button in the Skin Editor to activate it. For an endless loop, use 0.
Leveling
In order to get a good output from Pano2VR, the horizon needs to be known and the panorama needs to be level. Here, you can see at what angle the Pitch and Roll are currently.
This is a tool that is especially helpful for panoramas coming from the Ricoh Theta.
To level your panorama:
-
Hold down L. You’ll see a grid appear in the viewer.
✭ Tip: Add more grid lines in the Viewer Settings panel. -
Drag the panorama and line up the panorama to the grid.
For example, first line up a straight line (door jam, window) on the left most side of the preview window by dragging the panorama on the right most side. Without lifting up the L key, place your mouse on the line you just straightened and then drag on the left.
Maps
Custom Maps
When a custom map is provided in the Tour Map, the following properties are available when that map is selected:
Map ID – The map’s ID or name. This will also appear in the Map properties of the Map element in the Skin Editor.
Title – The maps’s title.
Map Provider – Select a map provider. The default maps provided are OpenStreetMap, Mapbox, and Google. You can also choose a different tiles provider with the Custom option. For example, Stamen makes some interesting tiles, including a watercolor tiled map. Depending on which option you choose here, you will get a set of more fields that pertain to the chosen provider.
URL Template – Enter the URL of the custom map tiles provider. This appears if Custom is chosen from the list of Map Providers. For example, the URL for the watercolor tiles from Stamen (as mentioned above) is: http://tile.stamen.com/watercolor/{z}/{x}/{y}.jpg
Maximum Zoom – Set the maximum amount of zoom levels. This determines how far in a user can zoom.
Floor Plans
When a floor plan has been added to the Tour Map the following properties will be available:
Map ID – The map’s ID or name. This will also appear in the Map properties of the Map element in the Skin Editor.
Title – The floor plan’s title. This title will appear in the maps list in the Tour Map.
File – The file of the floor plan. To see it’s location or change the file, click the folder button. To change the file, select the new file and choose, Open. Right click on the file name to open the context menu:
-
Edit – Edit the file name.
-
Show in Explorer/Finder – Open the file in Explorer or Finder.
Tags – Add tags to the floor plan. Type the tag and press tab, enter/return, or the spacebar to apply. Once a tag is added, it will be applied to any node located on the floor plan on output. The tags will be listed in the tags section of the User Data panel and can be filtered in the Tour Browser. They can later be used in the Skin Editor. For example, if you have a multi-level project, you can have a thumbnail controller that shows only the nodes on the current floor by applying the tag, Floor1 to a cloner element.
Georeference – Click this button to have Pano2VR copy the location data from the current floor plan to all other floor plans. This way, if you have multiple floor plans for the same location/building, you only need to measure and add the floor plan to the World Map once.
North – Set the floor plan’s North by entering North’s degree/angle or by dragging the North indicator in the Tour Map window.
Map Width – Enter the floor plan’s width. Measure Distance mode can also be turned on here.
Latitude – The floor plan’s latitude. Click the geolocate button to turn on Geolocate Mode which will insert the floor plan onto the map so it can be positioned manually.
Longitude – The floor plan’s longitude.
Nodes – Select Anchor GPS to map to keep the nodes position on the floor plan when you later move or rotate the floor plan on the world map.
The next settings are specifically for the outputted floor plan.
Format – Choose the image format of the floor plan.
Quality – Only available for JPG. Select the image quality of the JPG.
Background Color – Click the color to open the color picker to choose a background color for the floor plan. This is especially useful if the skin map element has a different aspect ratio than the floor plan and because of this there is some empty area. You can also use the color picker to set the Alpha Channel to 0, which will give a transparent background.