When adding text, a text field will appear in the Editor window.

Text Properties
Position
ID: Give the text element a unique ID or name.
Position: The x and y coordinates for the text element.
- Anchor: Use this grid to “stick” the element to a section of the movie window.
Size: Adjust the width and height of the text box.
Appearance
Scaling: Scales the text element along the x and y axes. Doubling the value on either axis, for instance, will double the size of the element. If a scaling modifier is enabled, this scaling setting is ignored.
- Center: Use this grid to determine how the text element scales. The default is set to the center so the element will scale in or out from its center. If you anchor the scaling to the upper left corner, for example, the scaling will center from this point.
Angle: Use this parameter to adjust the angle of the element. It will use the Center grid (above) as its axis. For example, if the center is chosen, it will rotate around its center. If the bottom left corner is selected, the rectangle will rotate around that corner.
Visible: Select or deselect to keep the text box visible or invisible. Visibility or invisibility can be changed and toggled with actions.
Alpha: The transparency of the text box. A setting of 1.000 is opaque. Lowering this number will increase the text box’s transparency.
Hand Cursor: Select to have the hand cursor show when the mouse rolls over the text box. This makes it more obvious to the user that the area or text box is interactive.
Rectangle
Background: Select, Enabled to show the background of the text box.
- Color: Use the color picker to choose a color for the background.
Border: The border or outline of the text box.
- Width: Defines how wide the border will be.
- Radius: Increasing this number will round the corners of the rectangle.
- Color: Choose a color for the border.
Text
Text: Add your text for the text box here. HTML tags can be used.
Color: Change the color of the text.
Align: Align the text within the box to the left, right, or center.
- Word Wrap: When selected, will wrap the text to the next line.
- Auto Size: Select this to automatically size the box around the text.
- Evaluate: Select this if JavaScript is being used in the text box above. This is useful for calling up any information found within your project.
Advanced
Hotspot Proxy ID: Enter the corresponding hotspot ID. The ID should come from the hotspot’s ID field in the hotspot editor. Using hotspot proxies gives you the ability to link skin elements to specific hotspots.
Limit Output: This option lets you selectively choose which element should not be used for either the Flash or HTML5 outputs.
Actions
In order for an object to act as a button, it needs to have a function or action applied to it.
Double-click in the Actions area or hit the plus sign to the right to open the Action Settings.

Action Settings
- Source: Choose what event will cause the action to occur.
- Action: Choose what will happen when the event occurs. For instance, if Pressed and Pan Left are chosen for a button’s action, and a user clicks on that button and holds down the mouse button, the panorama will pan left.
- Go to, Skin Actions, for details on all actions.
Depending on which action is chosen, different parameters that are associated with that action will appear. For example, for the pan actions, you can define the pan speed.
Also check out some Actions Examples.
Modifiers
Adding modifiers allows you to make elements move, scale or rotate when the movie is being is panned, tilted, zoomed or loaded. A good example of a use of a modifier is for a loading bar that scales in relation to how much of the movie has been loaded. (See the skin editor tutorial on building a loading bar for an example on using modifiers.)
Double-click in the Actions area or hit the plus sign to the right to open the Modifier Settings.
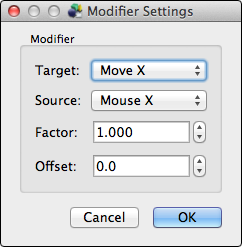
Modifier Settings
- Target: Choose from the menu how the object will be modified. The element can be modified to Rotate, and Scale and Move along the X and Y axes.
- Source: Choose what causes the selected Target Value. For example, if you had a radar image, you would want that image to move in relation to the panning movement of the movie. Therefore, you would set the Target Value as Rotate and the Source Value as Pan.
- Factor: Set the level of the Target Value. For example, if the loading bar should only scale to its original size, the Factor should be set to 1. If the the loading bar should scale to twice its size, the Factor should be set to 2.
- Offset: Set from where the Source Value begins. An offset of 0 means it starts from it’s original position. Or, in the case of Scaling, an offset of 1, for example, will start the scaling later so a portion of the loading bar is seen from the beginning of the load time.
- Go to, Skin Modifiers, for more details on all modifiers.
See also
Skin Editor
Using the Skin Editor
Floating Tooltip
Text Drop Shadow Effect
How to Scale Text
Formatting Text