3D Model Properties
Shows the model's file location, lets you set a background image, and adjust the model's position.
Input
3D Model
Type – Pano2VR will select the correct type of 3D model. However, there might be a time where you need to select the type manually. If that’s the case, choose between 3D Mesh (glTF/GLB), Gaussian Splat, and 3D tiles.
File – The 3D model’s file path. Drag the model here to add it to the project. Or click the folder icon to navigate to the file to add a new model.
Optimize on Output – Select (selected by default) to create a mobile-friendly version of the 3D model on output. When this is deselected, you will have to option to add your own mobile version to Mobile Version.
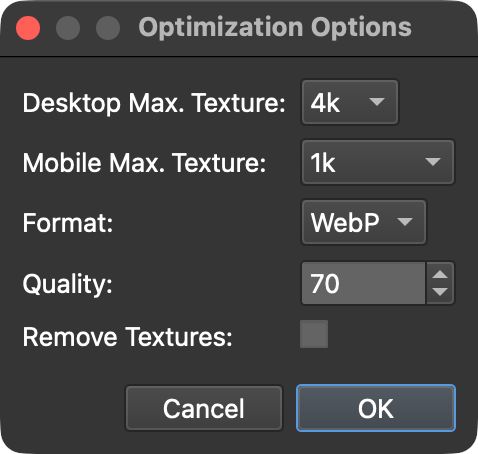
Click the Tools button for optimization options:
-
Desktop Max. Texture – Reduces reduce the texture size for the desktop version (default is 4K)
-
Mobile Max. Texture – Reduces the texture size for the mobile-friendly version (default is 1k)
-
Format – Choose the image format (default is WebP)
-
Quality – Adjust the JPEG quality. (default is 70)
-
Remove Textures – Remove the model’s textures. Useful for when the model will only be used for transitions and textures are not needed. This will also help reduce the file size on output.
Optimize Settings

Preview Image
File – The preview image used as the model’s thumbnail in skins and menus. If left empty, the Tour Browser’s low-resolution default view is used. To choose a different view or a custom graphic, select an image here by clicking the folder icon and navigating to the file. Or drag the file to the File area.
Click the camera button (Capture Preview Image) to capture the current view in the Viewer.
Background Image
Type – You can either let Pano2VR figure out which type of image is being imported by choosing Auto, or you can select an image type from the menu:
-
Solid Color – Select this and a color picker will be available. Click to choose a solid color as the background.
-
Auto – Auto will determine the type of image automatically and is the default setting.
File – Either enter the file path to the image to be imported or simply click the folder icon to navigate to and open the image. You can also drag the image to File to open the image.
Convert Input
The convert image settings here is identical to those found in Panorama settings.
Hide in Node List
Select Hide in Node List if you do not want the model to be visible in the node menu on output. For instance if the model is only used for panorama transition and not meant to be viewed on its own.
3D Model
Lock 3D Model
Select to lock the position of the model. When selected, Manipulate 3D Model Mode is disabled, along with position, rotation, and scale settings.
Position
The 3D model’s location in 3D space, defined by its X, Y, and Z coordinates.
Rotation
The 3D model’s orientation in 3D space, defined by its rotation angles around the X, Y, and Z axes.
+45 to rotate the model an additional 45 degrees.Scale
The size of the 3D model relative to its original dimensions.
Units/Meter
This is the conversion factor from the model’s units to real-world meters. Different 3D software use different units (for example, meters or centimeters), so set this value to ensure correct walking height and speed.
If you don’t know the value, use the Measuring Tool (ruler button) after importing: enter Measuring Mode, click one end of a feature with a known real-world size (a door opening, wall segment, etc.), click the other end (a green dot and guide line appear), then enter the real-world length. Pano2VR will compute the Units/Meter for you.
Fly Speed
Determine the speed of the Fly Camera Mode. 1 is the default speed. To fly faster pick a higher number, 2 will double the speed. To go slower, pick a number between 0 and 1.
Use model textures in transitions
When enabled (default), transitions between panoramas will use the model’s own textures. If disabled, only the model geometry is used, and the panorama textures are mapped onto it during transitions.
Choose the option that best matches your project:
-
If your model is high quality and its textures closely match the panoramas, using model textures will produce seamless transitions.
-
If the model’s textures differ from the panoramas (in lighting, color, or due to changes between capture times), using panorama textures may provide a more consistent appearance during transitions.
Load model on start
Select to have the model node loaded when the project starts. This will prevent any delay when transitioning between nodes when the model is used for transitions.
Materials
Choose which materials when rendering the 3D model in the output.
Keep Original Materials – Uses the model’s original materials, like its lighting and shadows.
Replace with Transition Materials – Replaces the original material with a special transition material so panoramas can be projected onto the 3D model during transitions. Depending on the model and its materials, this may not always render correctly. Complex materials can produce unexpected results, and visual artifacts may occur. Output the project to see the change in materials.
Replace with Basic Materials – Replaces the model’s original material with a basic material that shows only the texture, without additional lighting or shading. This works well for models created from photographs, where lighting and shadows are already part of the texture. For simpler models made in 3D software, however, the result may appear flat because no extra shading is applied to give the model more depth.
Reveal
(only available for Gaussian Splats)
This gives you the option to instantly show the Gaussian Splat in the output, or make it spread from the center outwards. For the ‘Spread’ option, you can also specify a speed.
Tags
Here you can specify a tag (or tags) for that model. These tags are assigned to all nodes that have a camera point in that model. For example, this can be useful to filter the Tour Browser to only show nodes that already have (or not have) a camera in a specific model. The tags can also be used in the Skin Editor.
Background Sound
The background sound properties are identical to the panorama’s properties.