Add a 3D model or Dollhouse to a Tour
Learn how to add a 3D model to a virtual tour. Works for larger landscapes, dollhouse views, or any other type of 3D model.

This workflow explains how to add a 3D model to your virtual tour.
While often used for outside scenes or dollhouse views, the same process applies to any type of 3D model. In this example, the 3D model is the starting node with hotspots linking from the model to other tour nodes.
Add and Set Up the Model
Let’s first set up the model’s position.
-
Drag the 3D model and tour nodes (if not already added) into the Tour Browser. For visual clarity, move the 3D model to the left-most edge of the Tour Browser. (This does not affect the linked tour.)
When the model is in the Viewer, the Viewer Modes will show tools for working with 3D models.
-
Set the default view of the 3D model. To do this, we first need to move the model around to get it centered and spinning around the pivot point.
-
Choose Manipulate 3D Model (M) from the Viewer Modes to move the model within 3D space.
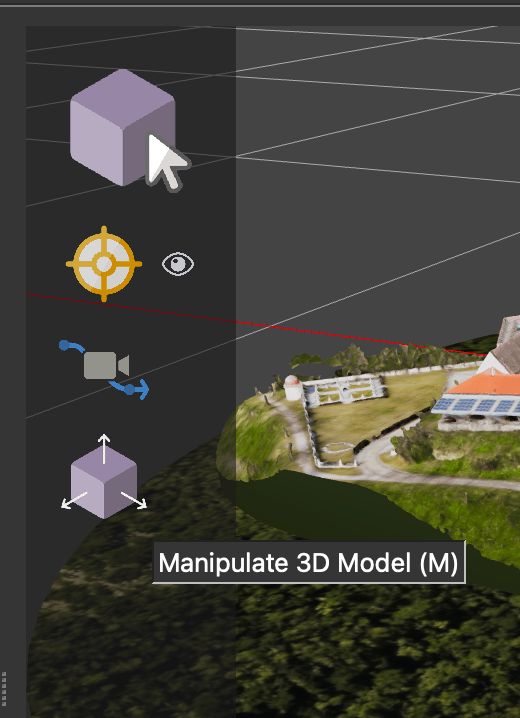
Manipulate 3D Model Mode Use the handles of the 3D Widget to drag vertically, horizontally, forward, and back.
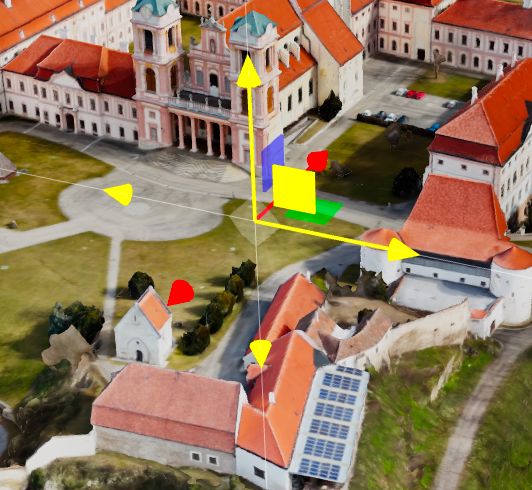
3D Widget Tool Switch to Rotate in the 3D Controller to rotate the model. Or hit 2 on the keyboard. To get back to the 3D widget, hit 1. More on moving the model.
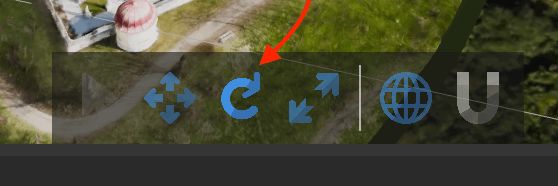
Rotate option in the 3D controller -
If necessary, adjust the model’s pivot point. This is the 3D point the camera orbits around.
Using the mouse or keyboard keys (A, S, D, Q, W, E) or cursor keys to spin the model.
-
-
Right-click anywhere in the Viewer and choose Set Default View. The 3D model will now open in this position.

Select Default View -
Choose the Preview Image for the thumbnail images in menus and in the Tour Browser.
- Manipulate the model to an angle you’d like to see as a thumbnail image.
- Go to the Input Properties. For Preview Image, click the Capture Preview Image button.

Preview Image


Now that the model is positioned in the Viewer, let’s link the model to tour nodes.
Link the Model to Tour Nodes
Next, add hotspots to the model so you can move to other nodes directly from the model.
-
Select the 3D model in the Tour Browser so it appears in the Viewer.
-
Change to Select (X) mode in the Viewer Mode.
-
Drag a tour node from the Tour Browser to its location in the model. This adds a Point Hotspot linked to that node.
-
Use the 3D Widget to reposition the hotspot if necessary. For instance it could be better to move the hotspot a distance away from the surface of the model, so that the hotspot will not intersect the model in the final output.
-
Set the Target View. This is the view shown when coming from the model. Option or Alt-click the point hotspot in the model, or click the bullseye to open the Target Viewing Parameters.
-
Save your project if you haven’t already. (Pano2VR saves backups of your project and skins.)
-
Optionally, add a hotspot back to the model from each node. For example, you can place the hotspot in the sky. Drag the model to a location in the selected node, just as you would for tour nodes.
-
Add a Web Output.
-
Choose a skin from the skins menu. Try the Neto skin if you’d like.
-
Output the project by clicking Generate Output in the Web Output.
If hotspots are partially covered by the model, go back and pull them up. Drag the top handle of the 3D Widget until the hotspot icons float above the model. Output and test again.
- Make any other changes you need, such as linking all tour nodes together. If you don’t link the tour nodes to each other, navigation can occur with thumbnail menus, which all the built-in skins include.
Link from Panorama to Model
Use the Target Camera to move from a panorama to a specific location in the 3D Model.
- In the 3D Model, change the Viewer to Camera Points (T) Mode.
- Double-click in the model to add a Camera Point.
- In the Camera Points properties, choose Target Camera for the Type.
- Adjust the camera’s position, field of View (FoV), and the Camera Mode.
- Select the panorama node that will connect back to the 3D model.
- Add a point hotspot.
- Choose Tour Node for the type.
- For the Tour Node, select the model.
- Click on the bullseye icon to open the Model Target View parameters, and choose the Target Camera you created in step 2.
This point hotspot is now linked to that target camera in the 3D model.
You can also use the 3D model to build smooth node transitions. This requires adding control points and camera points. Learn how use a 3D Model to build smooth node transitions