Contents
Settings Tab
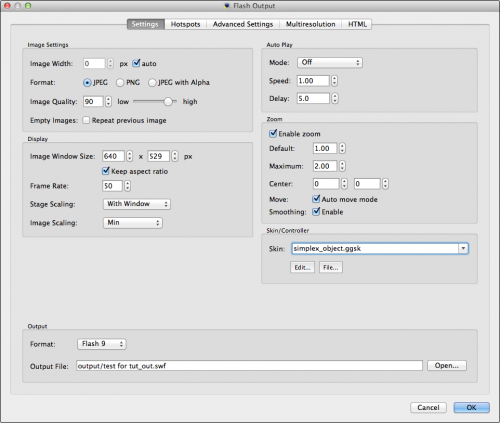
In the Flash Settings Tab you define how the movie will be displayed.
Image Settings
Image Width: Define the image width of your project in pixels.
- auto: Select to use the original width of the images. Auto will use the necessary size for the current state or window.
◊ NOTE: Because the entire image is stored within the SWF when auto is selected, the file size will be larger.
Format: Select the format of the outputted individual images. Choose from:
- JPEG
- PNG
- JPEG with Alpha
Image Quality: The overall quality of the image as defined in JPEG images. A quality setting of 90 is almost lossless, while a quality of 10 will very clearly show artifacts.
You can see the effects of this compression on an object movie here.
Empty Images: For projects that have empty images (not be confused with missing images), select this option.
- Repeat previous image: Select to have the image before the empty image repeated.
Display Settings
Window Size: This is the size of the movie window. Enter the desired size as width x height in pixels.
- Keep aspect ratio: Select to ensure that the aspect ratio does not change when adjusting the window size.
Frame Rate: The playback frame rate of the movie.
◊ NOTE: Frame rate speed depends on the total number of images within the series and the rotation speed set in Auto Play.
{{The default of 50 frames per second should work for most projects. However, for some, it may be too fast. Frame rate can be paired with the Auto Play speed.}}
Stage Scaling: Controls how the movie within the flash element is scaled.
- Show All: The movie and skin will scale to the window size while maintaining the aspect ratio by placing a border around the movie when necessary.
- With Window: The movie will maintain its aspect ratio when the movie window’s size changes. The skin will not scale. Example.
- Exact Fit: The movie will scale to match the size of the movie window. No border is seen and aspect ratio is not maintained.
- No Border: The movie will take on the window’s dimensions maintaining the aspect ratio, yet no borders are visible.
- None: The movie will not scale.
Image Scaling: How Object2VR scales the Flash element when the window size is a known factor – which is only known when With Window is chosen from Stage Scaling.
- Min: The movie will scale to the window size while maintaining the aspect ratio by placing borders around the movie when necessary. The skin is not scaled.
- Max: The movie will scale to window’s dimensions, maintaining aspect ratio and showing no borders.
- Horizontal: This option will scale the movie while keeping the horizontal dimension always in view.
- Vertical: This option will scale the movie while keeping the vertical dimension always in view.
- None: The movie will not scale.
Auto Play
Mode: How the movie will rotate.
- Off: Select this option when you wish to not have your movie automatically play. However, pressing a rotate/auto rotate button will allow the movie to rotate.
- Rotate: The movie will fully rotate through all images.
- Ping-Pong: The movie will rotate back and forth from the first and last images.
- Rotate Once: The movie will do one full rotation after downloading.
Speed: The speed at which the movie will rotate. A negative number (-1.00) will rotate the movie counterclockwise.
Delay: The time it takes for the movie to begin to rotate (in seconds) again after it has been manually moved or stopped by the user.
Zoom
Enable zoom: Select to allow zooming of the object movie.
Default: The initial zoom level. A default zoom of 1 means the image will be at its original zoom level (or have no zoom).
Maximum: The maximum zoom level. The default is set to 2. This means the movie can be zoomed in to two times it’s default zoom.
Center: Adjust the center of the zoom.
Move: Interaction of the object movie when zoomed in.
- Auto move mode: When selected, clicking and dragging the movie when zoomed in moves it like a flat image – no rotation occurs. When not selected, clicking and dragging will rotate the movie while zoomed in.
Smoothing: Select to Enable. When enabled, image distortion is reduced when scaled either via the window or zoom.
Skin-Controller
For Flash 9:
Skin: Choose skin from the menu. Any skins you create will also show up in this list (assuming they stored in the Skins folder.)
Edit: Click this to open the Skin Editor.
File: Click this to find and open a skin file.
For Flash 8 (Select, Flash 8, below in the Output section.):
External Controller: Choose an external controller (SWF) from the list.
Alpha: Adjust the controller’s transparency. 100 = Opaque.
Anchor: Click on a square in the grid to determine where the controller is anchored within the window.
Output
Format: Choose which Flash format to output.
- Flash 8: Select to output the movie in Flash 8. When selected, the Skin/Controller will change to adopt the Flash 8 Skin.
Output File: This displays the name and path of the file when outputted. Choose Open to select a different destination for the output. By default, the movie will be saved to the same directory as the image series.
Loading (Flash 8)
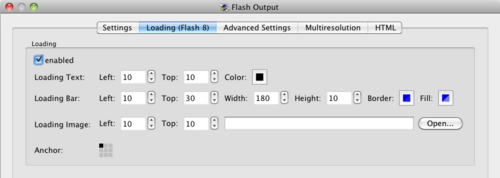
This tab only appears when Flash 8 has been selected as the Output Format.
Loading
This section allows you to customize a loading bar, text and image for the Flash 8 output.
Enabled: Select to create loading screen.
Loading Text: Customize the text.
- Left: Position of the text from the left corner in pixels.
- Top: Position of the text from the top in pixels.
- Color: Click the color box to open the color picker. Choose the text color
Loading Bar: Customize the loading bar.
- Left: Position of the bar from the left corner in pixels.
- Top: Position of the bar from the top in pixels.
- Width: Define the width of the loading bar.
- Height: Define the height of the loading bar.
- Border: Choose the loading bar’s border color by clicking on the color square to bring up the color picker.
- Fill: Choose the loading bar’s fill color by clicking on the color square to bring up the color picker.
Loading Image: Add a loading image.
- Left: Position of the image from the left corner in pixels.
- Top: Position of the image from the top in pixels.
- Open…: Click to navigate to the image file and click open to set it.
Anchor:Click on a square in the grid to determine where the loader is anchored within the window.
Hotspots
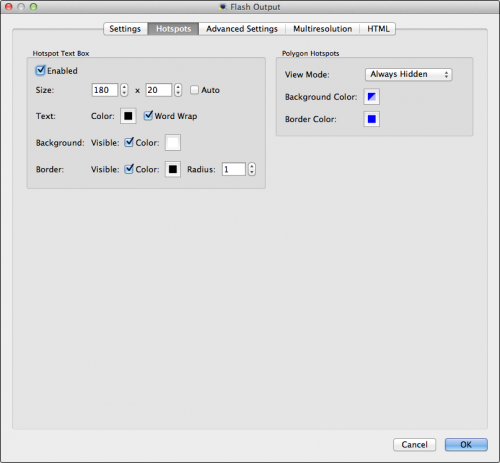
Customize the hotspot text boxes here if not otherwise using the Skin Editor.
Hotspot Text Box
Enabled: To show hotspot text boxes in your movie, make sure this is selected.
Size: Set the size of the text box for the hotspot.
- Auto: Choose this to have the text automatically fitted within the text box. The text box will be resized vertically.
Text: Customize the hotspot text.
- Color: Choose the text color.
- Word Wrap: This option will wrap the text within the text box.
Background: Customize the background of the text box.
- Visible: Select to show the background of the text box. When deselected, the background will not been seen
- Color: Choose a color for the background via the color picker.
Border: Customize the border of the text box.
- Visible: Select to show the border of the text box. When deslected, no border will be visible.
- Color: Choose a color for the border via the color picker.
◊ TIP: If you do not want to have the boxes visible at all – only the text – be sure to deselect Visible from both Background and Border.
Polygon Hotspots
View Mode: Choose how the hotspots appear.
- Always Hidden: The hotspots will never be seen. The only clue that the area is interactive will be the change in the mouse cursor.
- Always Visible: The hotspots will always be visible. Use the color pickers below to customize their look.
- Show Current: The hotspot area will fade in when mouse enters it and will fade out when it leaves. Use the color pickers below to customize their look.
- Show All: The hotspots will remain hidden, until the curser hovers over a hotspot, then all hotspots will be revealed.
Background: Choose the background color and transparency of the text box.
Border: Choose the border color and transparency of the text box.
Advanced Settings
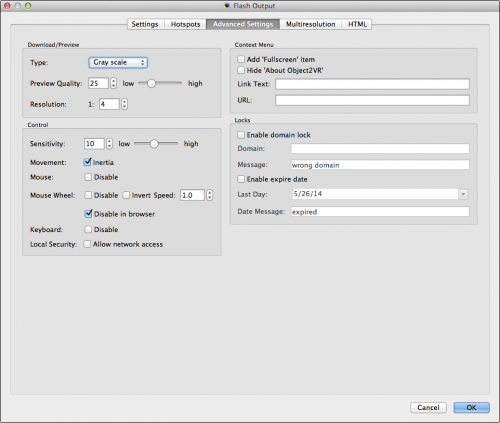
In the Advanced Settings tab you can customize your movie further.
Download-Preview
Type: What the movie will look like while it is downloading. Choose from the following:
- None: No preview image is shown.
- Gray Scale: The preview movie is in gray scale.
- Sepia: The preview movie is in sepia.
- Color: The preview movie is shown in full color.
Preview Quality: The image quality of the preview movie. (See some examples.)
Resolution: This represents how clear or blurry the downloading image will appear. This setting will effect the file size. The default setting is 1:4 which is a reasonably good setting. Setting it to 1:1, makes the downloading image as clear as the original image.
Control
Sensitivity: Set the movie’s sensitivity to the movement of the mouse. A low sensitivity will cause the object movie to move slowly with the mouse’s movement.
Movement: Describes how the object movie moves.
- Inertia: When enabled, the movie with gradually pick up speed when rotating and likewise, it will slow before coming to a stop.
Mouse: Mouse control.
- Disable: Select to disable interactivity via a mouse.
Mouse Wheel: Mouse wheel control.
- Disable: Select to disable interactivity via the mouse wheel.
- Invert: Select to invert the direction of movement initiated by the mouse wheel.
- Speed: Enter the speed of the movement when initiated by the mouse wheel.
- Disable in browser: Select to disable the use of the mouse wheel within a web browser.
Keyboard: Keyboard control.
- Disable: Select to disable keyboard control.
Local Security: Use this option to choose to have flash access a network or the local disk.
- Allow network access: Select to enable Flash to communicate with another website. When selected, Flash will not be given access to the local disk. When not selected, Flash can only access the local disk and will not have access to a network.
Context Menu
Add ‘Fullscreen’ item: Select to show a Fullscreen menu item in Flash’s right-click context menu.
Hide ‘About Object2VR’ : pro and studio
Select to hide the About Object2VR menu item from Flash’s right-click menu.
Add your own hyperlinked menu item to the right-click menu:
Link Text: Enter the text for the linked menu item.
URL:: Enter the URL for the Linked Text above.
◊ NOTE: Add the absolute URL. For example: http://www.example.com.
Locks
Enable domain lock: Enable this option when you wish to secure your movie only to the specified domains.
- Domain: Enter the domain to which the object movie can only belong. Separate multiple domains with a comma: www.gg-sw.com, www.nytimes.com.
- Message: Insert a message that appears if the object movie is displayed in a domain other than what is listed in Domain.
Enable expire date: Here you can an expiration date of the visibility of the movie.
- Last Day: Choose an end or expiration date. Click the arrow to open a calendar.
- Date Message: Insert a message that will appear when a user tries to access the movie after the expiration date.
Multiresolution Tab
Use the multiresolution feature for high resolution images and allow users to zoom in to see greater image detail.
Basic Settings
Enable: Select to enable multiresolution output.
When selected, a message will appear asking to automatically add levels. Choose Yes, to have Object2VR add levels (in the Levels section) based on the resolution of the image.
Level Tile Size: This determines the size of the sub tiles.
◊ TIP: For best results use settings between 250 to a 1000px.
Filename: This determines the file location and naming convention of the generated sub tiles. You may change the name to suit your project, but the placeholders must be used so Object2VR knows which tiles to use.
Generate Files: This option is selected by default to generate the multiresolution files. Once set up, you can deselect this option to stop Object2VR from regenerating the tiles each time the project is outputted.
Advanced Settings
Overlap: Keep selected to have the tiles overlap by one pixel to avoid visible seams in the image. If using tiles from a source other than Object2VR, this option may need to be deselected for correct tile alignment.
Raw Image Memory: Set how much memory will be used by the host computer for downloading tiles. Leave at default if the host has limited memory.
Bitmap Memory: This sets how much memory will be used by the host computer to store the decoded bitmap tiles. Leave at default if the host computer has limited memory.
Download Queue Size: This determines how many tiles are downloaded from the server at one time. Leave at default for optimum performance.
Decode Queue Size: This determines how many tiles are decoded to bitmaps and are ready for use at any time. Changing this setting may affect the performance of the host computer. Leave at default for optimum performance. If the host computer is stuttering when trying to show the tiles, try increasing the queue size if the tiles are small; or trying lowering if the tiles are large. Generally, the default should work well for most projects.
Levels
When multiresolution is enabled, Object2VR can automatically set levels.
More levels can be added by choosing the Add button in the upper right corner. The pixel size can also be changed. To remove levels just click the red X to the right of the level you wish to remove.
Embed: Select this to determine which tile levels will be embedded in the SWF.
Load at Startup: This determines which level will be used when the player is first opened.
Decode at Startup: This determines which level will be decoded when the player is first opened.
HTML Settings
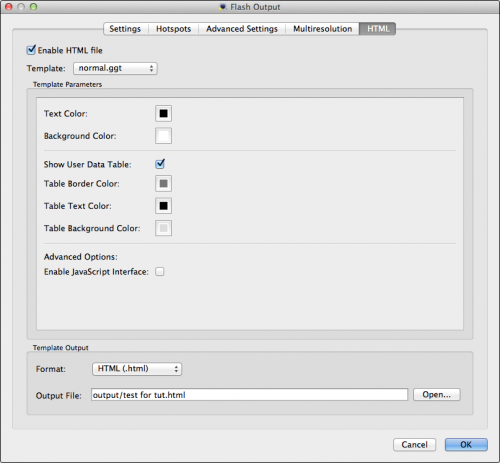
Enable HTML File: To include an HTML template when outputting the movie, select this option (it should be selected by default). This file can then be later edited and customized for your needs.
Template: Choose from normal.ggt or fullscreen.ggt.
In the fullscreen template, the project will fill the browser window
Normal Template Parameters
Text Color: Use the color picker to choose a color for the HTML text.
Background Color: Use the color picker to choose a color for the background of the HTML page.
Show User Data Table: Select this to show the information entered in the User Data section.
Table Border Color: Use the color picker to choose the border color for the user data table.
Table Text Color: Use the color picker to choose the table’s text color.
Table Background Color: Use the color picker to choose the user data table’s background color.
Advanced Options:
- Enable JavaScript Interface: Select this to include the JavaScript interface.
Fullscreen Template Parameters
Text Color: Use the color picker to choose a color for the HTML text.
Background Color: Use the color picker to choose a color for the background of the HTML page.
Borderless Fullscreen: Select to ensure a full window fullscreen (without browser toolbars).
Template Output
Format: Choose from .html or .htm as the file’s format.
Output File: Choose Open to find a destination for the output.
◊ NOTE: $n is a placeholder and will be replaced with the name of the images’ folder. This is only seen if no image has been imported.
◊ TIP: Save the the HTML file in the same directory as the Flash movie.
See also
Flash Output (Object2VR)
HTML Template
Object2VR Workflow
Chromeless PopUp Template
