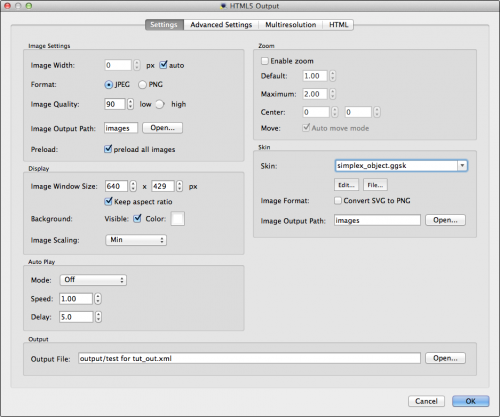
Settings Tab
Image Settings
Image Width: Enter the desired image width.
- auto: This is selected by default and will have Object2VR choose the maximum pixel width needed.
◊ NOTE: A pixel width smaller than the image window size will result in a blurry image. Also, depending on the combination of window and image width, zoom factor may be affected.
Format: Select either JPEG or PNG as the preferred output image format.
Image Quality: The overall quality of the image as defined in JPEG images. 90% is the default value; lowering the value below 90 will decrease the quality of the outputted image.
Image Output Path: This option lets you choose a name and location to store the outputted images’ folder. By default, Object2VR will create a folder called images in the same location as the original images.
Preload: Select to have all images preloaded for a single resolution object movie.
Display
Image Window Size: Adjusts the width and height of the movie window.
- Keep aspect ratio: Keeping this option selected ensures that the window size’s aspect ratio will not change when adjusting the window size.
Background: The movie window’s background visibility and color.
- Visible: Select to keep the background visible
- Color: Choose the color of the background. Clicking on the color square opens the color picker.
Image Scaling:: This setting ensures that image boundaries/edges stay true to the image’s window or scaling option. When the window size is changed, the image is scaled accordingly..
- Min: When this option is chosen, whichever dimension is least (vertical, horizontal or diagonal) will stay within the field of view when the image is scaled.
- Max: When this option is chosen, whichever dimension is greatest (vertical, horizontal or diagonal) will stay within the field of view when the image is scaled.
- Horizontal: Choose this option to ensure the horizontal field of view is most important and is always visible when scaling the image.
- Vertical: When the image is scaled or window resized, the vertical field of view will stay true.
- None: No scaling will occur.
Auto Play
Mode: How the movie will rotate. Choose from three rotation options:
- Off: Select this option when you wish to not have your movie automatically play.
- Rotate: The movie will fully rotate through all images.
- Ping-Pong: The movie will rotate back and forth from the first and last images.
- Rotate once: The movie will do a full rotation only one time.
Speed: The speed at which the movie will rotate.
Delay: The time it takes for the object to begin to rotate (in seconds) again after it has been manually moved by the user.
Zoom
Enable zoom: Select this to allow zooming in your object movie and to edit the zoom parameters.
Default: The initial zoom level. A default zoom of 1 means the image will be at its original zoom level (or have no zoom initially applied.)
Maximum: The maximum zoom level. The default is set to 2. This means the movie can be zoomed in two times it’s default zoom.
Center: Adjusts the center of the zoom.
Move: This toggles how the user interacts with the movie when zoomed in.
- Auto move mode: Select to move the movie as a flat image (no rotation). De-select to be able to rotate the movie when zoomed in.
Skin
Skin: Here you can choose either one of the pre-installed skins or choose one that you have created. The file extension used for the skins is .ggsk (stands for Garden Gnome Skin).
◊ TIP: The skin, simplex uses scalable vector graphics (SVG).
Edit: Clicking this will bring you to the Skin Editor.
File: Click here to choose a skin from the Garden Gnome skins folder.
Image Format: Select, Convert SVG to PNG to have any SVGs in the skin (i.e. simplex.ggsk), converted to PNG. If this is not selected, Pano2VR will output both formats in the case a Flash fallback will be used.
Image Output Path: This creates a folder to contain the images of the skin and by default is placed in the same location as the object movie. The default is the same folder as the default folder (images) that holds the object movie images. The name of this folder can be changed.
- Open…: Click here to choose a specific location for the folder.
Output
Output File: Change the name of the file (if you wish) and choose where to save the outputted files associated with the project. The default is to output the file in the same folder as the original images.
- Open…: Click to save the project elsewhere.
◊ NOTE: $n is a placeholder and will be replaced with the object images’ file name.
Advanced Settings
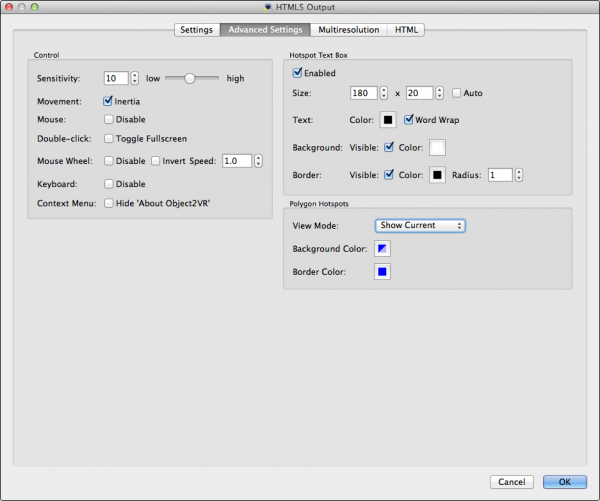
Control
Sensitivity: Set the movie’s sensitivity to the movement of the mouse. A low sensitivity will cause the panorama to move slowly with the mouse’s movement.
Movement: Control of the panorama.
- Inertia: When this is enabled, the panorama will slowly come to a stop – as if it has mass. If not enabled, it will stop immediately.
Mouse: Mouse controls.
- Disable: Select to disable interactivity with the movie via the mouse.
Double Click: Choose what should happen when a user double-clicks or double-taps.
- Toggle Fullscreen: Select to initiate a fullscreen toggle mode via a double click with a mouse or double tap on a touch interface. Image only.
Mouse Wheel: Mouse wheel controls.
- Disable: Disable interactivity with the panorama via the mouse wheel.
- Invert: Invert the interactivity of the mouse wheel. For instance, scrolling down will zoom the movie out (instead of zooming in).
- Speed: The rate at which the panorama will move relative to the mouse wheel.
Keyboard: Keyboard control.
- Disable: Select this to disable interactivity with the the object movie via the keyboard.
Context Menu: pro & studio – This option allows you to hide the branding found in the context menu of the player.
- Hide ‘About Object2VR’: Select this to hide the About Object2VR in the player’s context menu.
Hotspot Text Box
Enabled: Select this box to show hotspot text boxes in the object movie.
Size: Set the size of the text box for the hotspot.
- Auto: Choose this to have the text automatically fitted within the text box. The text box will be resized vertically.
Text: This sets the text color for all hotspot boxes.
- Color: Click the color box to choose a text color.
- Word Wrap: This option will wrap the text within the text box.
Background: This is the visible area behind the object movie window.
- Visible: Select to show the background of the text box.
- Color: Clicking on this color box will open the color picker. Choose a color for the background.
Border: This is the line that borders the text box.
- Visible: Select to show the border of the text box.
- Color: Clicking on this color box will open the color picker. Choose a color for the border.
- Radius: The radius (roundness) of the box’s border. Increase the number for a round rectangle or eventually a circle.
◊ TIP: If you only want the text visible (no boxes), be sure to deselect Visible from both Background and Border.
Polygon Hotspots
If you’ve added polygon hotspots in the Hotspot Editor, then these settings will affect how they appear.
View Mode: Choose how the hotspot appears on screen:
- Always Hidden: The hotspots will be active, but not highlighted.
- Always Visible: The hotspots will always be active and visible (see background and border colors).
- Show Current: The hotspot will only be visible when a mouse enters the active area.
- Show All: All polygon hotspots will be visible.
- Disable: Disable the background and border for the hotspots.
Background Color: Choose the fill color of the hotspot.
Border Color: Choose the border color.
Multiresolution Tab
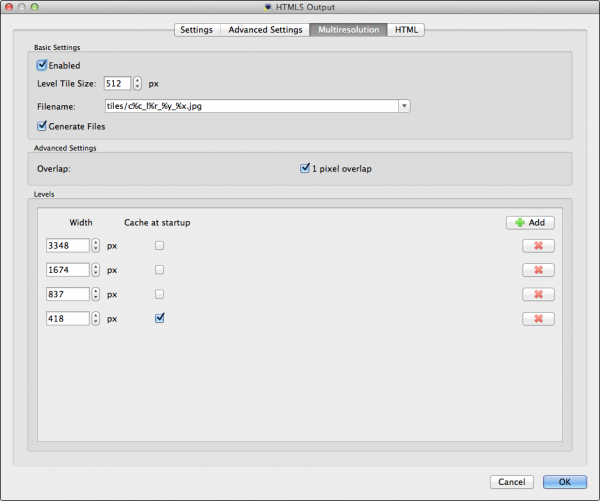
Basic Settings
Enabled: Select to enable multiresolution output. Once you select this, a dialog appears asking you if Object2VR should add Levels. Choosing, Yes, will add the first levels. If you choose, No, you can manually add the levels.
Level Tile Size: This determines the size of the sub tiles in pixels.
◊ TIP: For best results use settings between 250px to 1000px.
Filename: This determines the file location and naming convention of the generated sub tiles. You may change the name to suit your project, although the placeholders must be used so Object2VR knows which tiles to use.
Generate Files: This option is selected by default to generate the multiresolution files. Once multiresolution is set up, you can deselect this option to keep Object2VR from re-generating the tiles each time the project is outputted. (It’s a time-saver!)
◊ TIP: This is especially helpful if doing a timelapse with a lot of images. For the initial output, enable multiresolution. Set up only one level that matches the size of the images. For the next output, make sure Generate Files is deselected. This way, every time you want to go back and edit the project, the images don’t have to be regenerated.
Advanced Settings
Overlap: Keep selected to have the tiles overlap by one pixel to avoid visible seams in the image. If using tiles from a source other than Object2VR, this option may need to be deselected for correct tile alignment.
Levels
When you enable multiresolution, Object2VR automatically sets three levels.
More levels can be added by choosing the Add button in the upper right corner. The pixel size can also be changed. To remove levels just click the red X to the right of the level you wish to remove.
Width: The width of each level’s tile size and can be edited.
Cache at Startup: This determines which level will be used when the player is first opened. The first level is selected by default. Selecting more (or the larger levels) may cause a longer loading time on the end user’s device.
Remove levels: Click the red X to the right, of the level you wish to remove.
HTML Tab
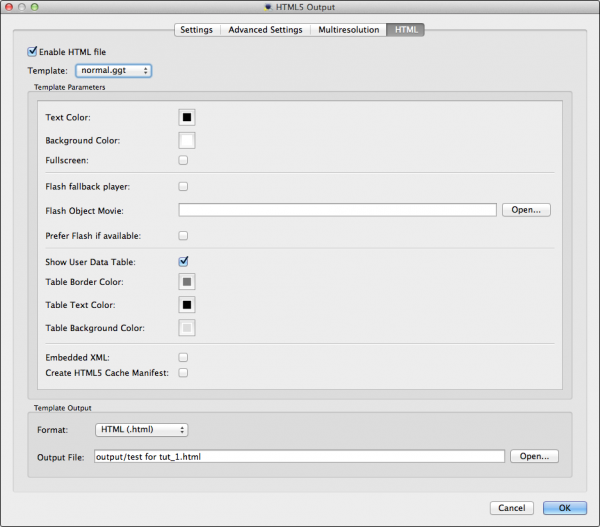
Use this tab create a customizable HTML template.
Information on the coding language used to create the HTML template can be found here.
To access the HTML template parameters, select Enable HTML File, if it is not already selected by default.
Template: Currently, there are two templates to choose from, normal.ggt and ggpkg.ggt.
Normal Template Parameters
Text Color: Click the color box to open the color picker. Choose the color of the text.
Background Color: Click the color box to open the color picker. Choose the color of the page’s background.
Fullscreen: Select this to have the movie open in fullscreen within the browser.
◊ NOTE: When this is selected, the User Data Table will not be visible.
Flash fallback player: Select to use a Flash player that uses the XML file to playback the project. If using this, there’s no need to add a fallback file (SWF). See: HTML5 Flash Fallback Player.
Flash Object Movie: Add the Flash version (SWF) of the object movie here so that browsers that do not support HTML5 3D transformations, but do support Flash can properly playback the object movie. If you are using the fallback player, you do not need to add a SWF here.
Prefer Flash if available: Select this to have Flash as the preferred player. If a browser supports both HTML5 3D transformations and Flash, the Flash version will played via the Flash player.
Show User Data Table: Select this to show the user data table.
Table Border, Table Text, Table Background Colors: Use these color pickers to customize your table.
Embedded XML: Embeds the XML file in the HTML template. Good for when browsers (like Chromoe) can’t read the external XML file.
Create HTML5 Cache Manifest: Select this option to have the ability to access the panorama offline. This outputs a manifest file, called: projectname_out.manifest
See Cache Manifest File.
Template Output
Format: Choose between extensions, .html and .htm
Output File: If you wish, change the name of the file and choose where to save the outputted HTML file. The default is to output the file in the same directory as the original image. If no change is made here, this is where you will find your outputted image.
◊ NOTE: $n will be replaced with the name of your original image.


