You can add areas of interaction, called hotspots to your object movies. They can be used to show information about the product or to highlight an area of the movie or to link to websites.
Point and Polygon Hotspots
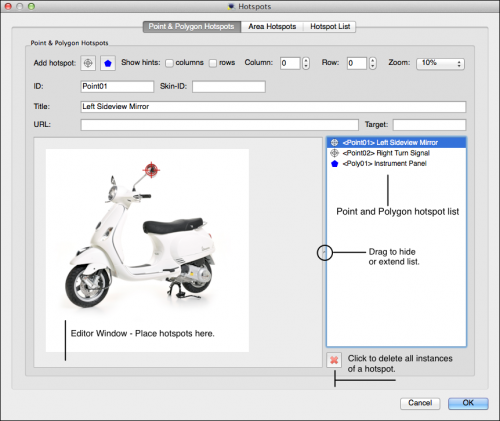
A point hotspot defines a point of interactivity within the panorama. A polygon hotspot defines a customizable, user defined area of interactivity.
Add hotspot: Click either of the following to add a hotspot.
Show hints: Point Hotspots only Select Columns and/or Rows to show previously placed hotspots. These can help you line up the hotspots around a spinning object.
Column: Select a column image.
Row: Select a row image.
Zoom: Zoom into the image by selecting a zoom level.
ID: The hotspot’s identification. This will be automatically named, but can be edited.
Skin-ID: Use this ID to connect this hotspot to a hotspot template. For example, if there is a hotspot template called, wiki, and you would like a point hotspot to take that template’s characteristics, you would enter, wiki, in this field.
Title: Add the title of the hotspot here. This title will be visible when the mouse pointer hovers over the hotspot.
URL: You can add a web URL or even a local URL. For example, you could use an External Loader in the Skin Editor and use a placeholder ($hu) in this field to call up an image.
Target: Add a target to specify how the page or image opens.
Area Hotspots
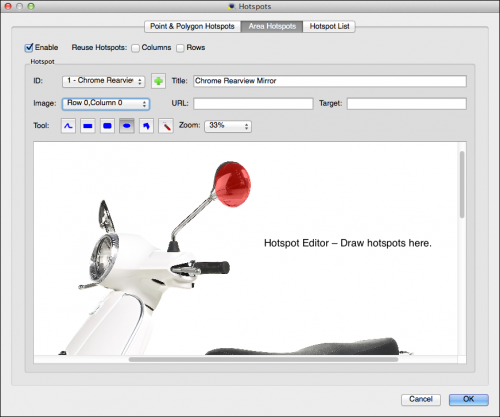
Area hotspots are similar to polygon hotspots. If possible, we recommend not using these and to switch to using polygon hotspots instead.
Enable: Select this to activate the hotspot editor.
Reuse Hotspots: If the hotspots you will be adding should be visible on every image, select the appropriate choice(s): Columns or/and Rows.
- A single-row project will only display Columns for hotspot reuse.
- A multi-row project will display both Columns and Rows for hotspot reuse.
ID: The hotspot’s unique identification. Click this button, , to add a new hotspot.
Image: This menu will display a list of all the images available to draw hotspots.
- When both Columns and Rows are selected in, Reuse Hotspot the menu will display, All. If none are chosen, the image numbers are displayed in the Image menu. If you have a multi-row project and selected either Columns or Rows, then the images that will not reuse the hotspot are displayed in the Image menu.
Title: Add the title of the hotspot. This title will be visible when the mouse pointer hovers over the hotspot.
URL: You can add a web URL or a local URL to a file or image.
Target: Add a target to specify where to open the website or file.
Zoom: Zoom in to your image for easier placement of the hotspot.
Tool: Use these tools to draw your hotspot area.
| Pen | Use this to manually draw your hotspot editing area. | |
| Rectangle | Use this to draw a rectangular hotspot area. | |
| Rounded Rectangle | Draw a rectangle with rounded edges for the hotspot area. | |
| Ellipse | Use this tool to draw the hotspot as an ellipse. | |
| Polygon | Draw a polygon shape for the hotspot. | |
| Erase | Use this tool to erase the hotspots. Then choose a shape tool to draw over the hotspot to be erased. The hotspot shape will then turn blue and the erasing shape will be red. |
Hotspot List
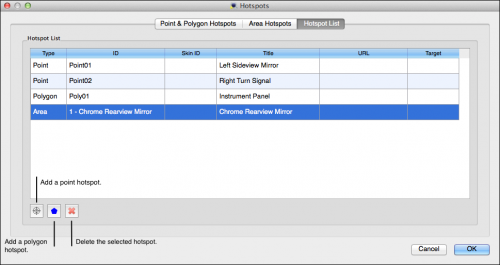
The hotspot list shows all the hotspots that have been added to the image.
Every field, except the Type column, is editable; just double-click to edit.
See also
Adding Hotspots beta (Object2VR)
External Image Properties
Previous Hotspot Editor


