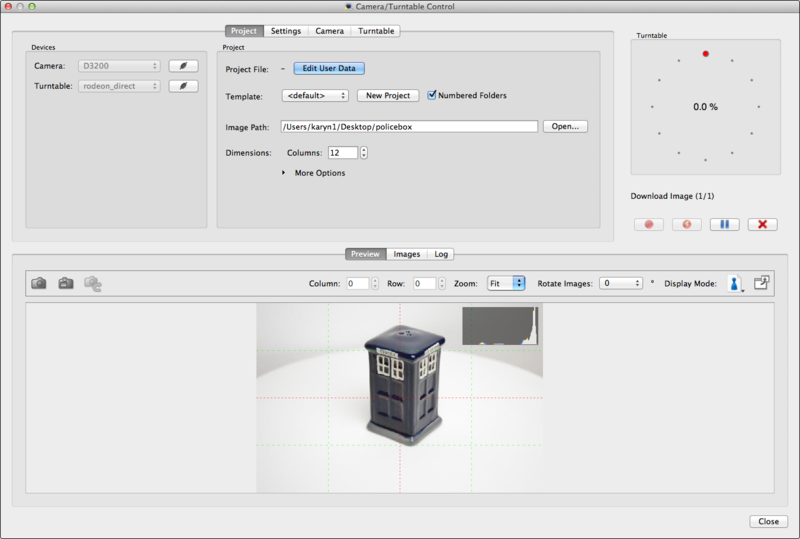
Object2VR Studio gives you the ability to control both your camera and turntable. Open the Input settings by choosing Capture Input in the Main Project Window‘s Input section.
Contents
The Camera/Turntable Control settings are split into 3 sections. The Project , Settings, Camera and Turntable tabs are where you set up and define the project. The Turntable section is where you start the recording processing; and the Preview, Images and Log tabs are where you can see previews of the images and information on the running tasks.
Project Tab
Under the Project Tab, you can select and connect your hardware and define project parameters.
Devices
Camera: Displays the camera that is plugged in to computer via USB. Connect the camera to Object2VR by clicking the Connect/Disconnect button.
Turntable: Displays the turntable that is plugged in to the computer via USB. Connect the table to Object2VR by clicking the Connect/Disconnect button.
Project
Project File: The name of the project file will be displayed here. If the project has not yet been saved, only a dash (-) be will seen. Click, Edit User Data, to go directly to the User Data information to add or update the information.
Template: Choose a saved template that stores your setting preferences.
New Project: Click to create a new project; A dialog will appear. Choose the new location. However, if Numbered Folders is selected, it will automatically create a new folder with a numbered sequence.
Numbered Folders: Select to output the new project folder in a numbered sequence. You will see this update in the Image Path. This is helpful if you are shooting multiple series of the same type of object. You can easily start a new project from this window that uses the same settings and connections.
◊ TIP: You can set the sequence to start at any number simply by adding a number to folder name in the Image Path.
Image Path: This is where the images will be stored. Choose, Open…, to change the location.
Dimensions: Set how many Columns you’ll be shooting. Rows and States are visible under More Options.
Capture: Click, More Options to reveal. If the turntable is capable of shooting only one row at a time, you can manually
tell Object2VR which Row and State to capture.
Settings Tab
In the Settings Tab, you make an initial, one-time set-up if your capturing process doesn’t change.
Trigger
This section defines how the camera will be fired.
Trigger: Choose how the camera will be fired.
- USB/PTP: Over USB.
- Turntable: Via the turntable. Some turntables can also fire the shutter release. This is useful for when a camera cannot be fired over USB.
- Manually: You can always choose to fire the camera manually. This is useful when the object, itself, needs to be moved in between shots.
The following two options give objects time to stop moving after the table turns or after moving the object itself.
Delay before Trigger: Set the amount of delay after the turntable spins and before the camera triggers.
Delay after Trigger: Set the amount of delay after the camera triggers and before the table spins.
Image Source
Image Source: Choose how the images come into Object2VR. Whichever setting is chosen, the settings will change accordingly.
USB/PTP: The images can be transferred through USB.
- Storage: Select Shoot to RAM to have the images stored on the camera’s RAM. This eliminates the need to have a media card in the camera.
- Download: Select, Interleaved, to download the images faster when a system has slow memory (DRAM).
- Rename Image Files: Keep this selected to use the specified file naming pattern outlined below in Pattern.
- ◊ NOTE: This option is not available if Shoot to RAM is selected.
- Pattern: Use this to define a naming convention for an image sequence. Learn more.
Watched Folder: Choose a folder for Object2VR to watch for incoming images.
- Watched Folder: Click, Open…, and choose a folder.
- Mode: Select one of the following which will tell Object2VR what to do with the images.
- Link: Object2VR will point to these files and will not move or copy them to the output folder.
- Copy: Object2VR will copy the images to the output folder.
- Move: Object2VR will move the images to the output folder.
- Download: Select, Interleaved, to download the images faster when a system has slow memory (DRAM). When selected, Object2VR will not wait for the image to finish downloading before moving on to take the next picture.
Manual: Import the images manually.
- Rename Image Files: Select to use the specified file naming convention outlined below in Pattern.
- Pattern: Use this to define a naming convention for an image sequence. Learn more.
Camera Tab
In the camera tab, you can see your camera’s software settings. If the camera is set to Manual, all settings like Aperture and Shutter speed can be changed. (Depending on the camera model.)
Camera Settings
To change the Aperture, Shutter and ISO values, do any of the following:
- Drag sideways.
- Click on the triangles on left and right.
- Click on the up and down arrows to open the menu and choose the value.
Information
Here, various information pertaining to camera and lens can be found. In the example below, the amount of battery left is visible along with the focal length of the lens.
Turntable Tab
In the turntable tab, you can set up your turntable settings. Information on the settings for each table manufacturer can be found below.
Turntable Animation
Transport controls: The transport controls are the buttons below the animation panel.
Start Capture: Press to start taking rotating the turntable and taking pictures. Once this is pressed, the animation will appear.
Quick Shoot Mode: This will keep the turntable spinning while the camera fires. The turntable must control the camera for this to work. If your turntable does not support Quick Shoot Mode, then this button will not appear.
Pause: Click to pause the shoot. Click again to resume.
Abort Capture: Click to abort the capture.
Preview Tab
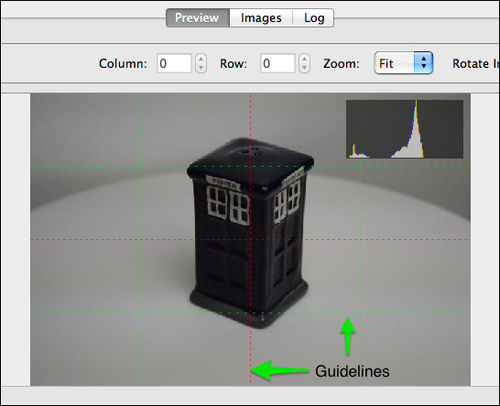
If your camera supports Live View, the Preview will be very helpful. This is where you can view the live image and use the tools to get the wanted exposure.
Test Shot: Click this button to take a test shot. The image is not saved but is displayed in the viewer until you take another test shot or switch to Live View.
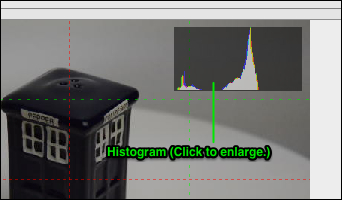
Live View: Click to turn Live View on or off. The live image coming from the camera will be visible with a histogram in the in upper right corner of the image.
Reshoot: Click to reshoot the image in the preview. This is useful when only one shot in the series needs to be retaken and avoids having to take the whole series once again.
◊ TIP: You can also reshoot an image directly in the Images tab by right-clicking an image.
Column and Row: Dial in to a specific image.
Zoom: Enlarge the image or fit the image within the window. If Fit is chosen, the image will resize when the program window is resized.
Rotate Images: Choose to rotate the images if needed.
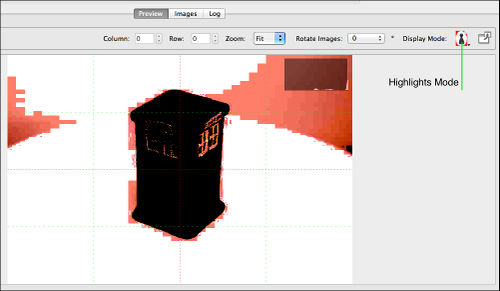
Display Mode: The Display Mode will help you to get the exposure that’s needed for that object.
- Normal Mode: The image is shown without any overlay or colorization.
- Highlights Mode: This will display the highlights that are nearly blown out as red, while the blown out highlights will be displayed in white. If you’re using a white background and turntable, you might want the highlights blown out.
- Shadows Mode: This displays black as black and nearly black as red.
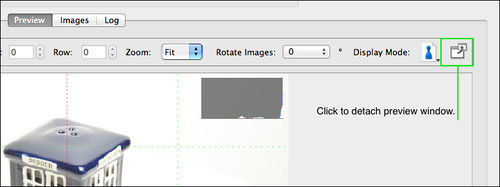
Detach Preview Window: Click to pop out the Preview window as a separate window.
Right-click on the preview image to bring up a context menu with the following options:
- Zoom
- Display Mode
Histogram: A histogram is featured in the upper right corner of the Live View preview image. Click it to magnify.
Guidelines: There are red (center) and green (thirds) guidelines to help you position the object.
Images Tab
The Images tab is where all the images in the series can be viewed. The thumbnail size can be changed using the slider in the upper left corner.
Right-click on any image to:
- Reshoot: Select this option to reshoot that particular image in the sequence without reshooting the entire sequence.
- Show in Preview Window: Select to review the image in the Preview Window.
- Open in Finder/Explorer: Select to show this image in the Finder or Explorer.
Log Tab
The log shows you all that is happening. If there’s issue with the connections, for example, check here for information. You can also keep an eye on your image taking process here.
Hardware Support
Cameras
Object2VR supports the PTP protocol as well as Canon’s EDSDK. This means you can use Nikon or Canon DSLRs to shoot directly into Object2VR. You can use other cameras as well if the files are transferred outside of Object2VR (for example the camera vendors software, Eye-Fi,etc…). Object2VR can then import these images with a watched folder.
Turntables
Some turntables will require drivers to be installed. Check with the table manufacturer for exact details.
We currently support:
Current list of supported turntables
See also
Project Window (Object2VR)
Clauss Rodeon
Image Processing (Object2VR)
Image Sequence Pattern (Object2VR)
Capturing Images (Object2VR)
