Point Hotspot Properties
Point Hotspots are interactive points that open websites, PDFs, videos, informational texts, and more. This article covers all the properties of a point hotspots.
The hotspot properties are in the Properties Panel and appears once a hotspot is added or selected.
ID
The ID of the Point Hotspot. You’ll find this ID addressed in the Skin Editor and listed in the outputted XML. Object2VR automatically assigns the IDs in consecutive order. They can be renamed.
Type
Choose what the hotspot should do. What you choose here affects the Link Target URL below.
URL – Enter the website URL or file name of a node (
http://www.example.com).
Image – Clicking on an image hotspot results in opening an image. Click the folder button for Link Target URL to navigate to an image.
Video – Show a video when the hotspot is clicked. When Video is selected, a menu appears for you to choose the video’s Source: URL, File, YouTube, Vimeo.
Info – Use this to popup an information window displaying the text entered for Title and Description.
PDF – This hotspot opens a PDF. Navigate to the file using the open file button for Link Target URL.
Skin-ID
Use the Skin-ID to connect this hotspot to a hotspot template. For example, if there is a hotspot template called, wiki, and you would like a point hotspot to take that template’s characteristics, you would enter, wiki, in this field.
Depending on the point hotspot’s type, the Skin-ID will be prefilled with an ID
that’s used by the hotspot templates in the built-in skin. For example, an
info type point hotspot will have the Skin-ID of ht_info. This can be
overwritten if your skins don’t use the same convention.
Title
Add the title of the hotspot here. This title is visible when the mouse pointer hovers over the hotspot. For example, a tooltip.
Description
Enter a description of the hotspot here or text for an information pop-up box. If you plan to use an information hotspot template, the description would appear in the info pop-up box.
Type Parameters
The options here will depend on what is chosen for Type.
The file field found in Image, Video File, and PDF, has a context menu. Right-click in field to bring up the menu.
URL and Info
Link Target URL – Enter the web URL or path.
Target – Add a target to specify where/how to open the website . This determines if the URL is opened in a new browser window, in the same window, etc. Use the Copy button to copy the same target to all nodes in the project.
| Target | Action | |
|---|---|---|
_blank |
Opens the linked document in a new window or tab | |
_parent |
Opens the linked document in the parent frame | |
_self |
Opens the linked document in the same frame as it was clicked | |
_top |
Opens the linked document in the full body of the window |
Image
Image File – Click the folder icon to navigate to the image file.
Target – Add a target to specify where/how to open the website . This determines if the image opens in a new browser window, in the same window, etc. Use the Copy button to copy the same target to all nodes in the project.
| Target | Action | |
|---|---|---|
_blank |
Opens the linked document in a new window or tab | |
_parent |
Opens the linked document in the parent frame | |
_self |
Opens the linked document in the same frame as it was clicked | |
_top |
Opens the linked document in the full body of the window |
Video
Source – Select the video source. Depending on the chosen video source, specify the file, web URL or Youtube/Vimeo URL below:
-
Video File – Click the folder icon to navigate to the video file.
-
Video URL – Add the URL of the video.
-
YouTube ID – Add the YouTube share link. Time stamp links are supported, for example
https://youtu.be/ElPYmmlcUh8?t=307. -
Vimeo ID – Add the Vimeo URL. For example,
https://vimeo.com/694838103.
PDF File – Click the blue folder icon to navigate to and add the PDF file.
Target/Start Page – If the skin supports PDF hotspots (includes a PDF Element), enter the page number for Start Page. If the skin does not support PDF hotspots, indicate how to open the PDF in a browser.
| Target | Action | |
|---|---|---|
_blank |
Opens the linked document in a new window or tab | |
_parent |
Opens the linked document in the parent frame | |
_self |
Opens the linked document in the same frame as it was clicked | |
_top |
Opens the linked document in the full body of the window |
Custom Image
Here, you can quickly assign a hotspot a custom image. This is useful for when a specific image is needed for one particular hotspot. For instance, if you are using a skin, but one hotspot needs a different image/icon, you can add it here. Likewise, you can add a custom image without having to create and add a skin.
Add the custom image by clicking the folder and navigate to the image. Once the image is added, it’ll be visible in the Viewer. To resize the image, drag on the red handles.
- Width and Height – The image’s dimensions.
Custom Properties
Custom Properties allow for additional parameters.
Click the plus button to add a custom property. A dialog appears where you define the parameters of the custom property:
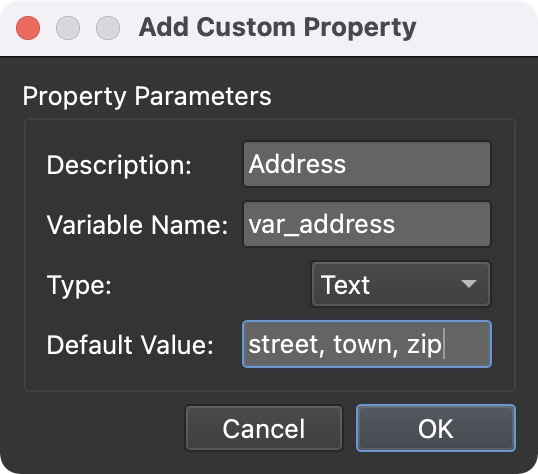
The custom property is a variable that is used in the skin. For Type, choose from Text, Number, or True/False as the variable type.
Once a skin is opened from the Web Output, the variable created here will be added as a variable in the skin properties.

A custom property can also be created from existing skin variable. Long press the plus button to create a custom value from a skin variable.
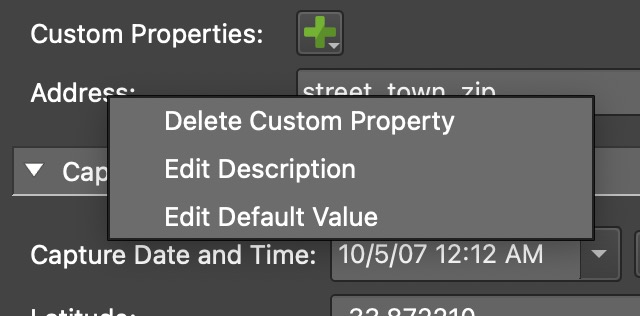
Right-click the label of the custom property to change the default value and the description, and to delete the custom property.
Learn how to add custom properties