Contents
Settings Tab
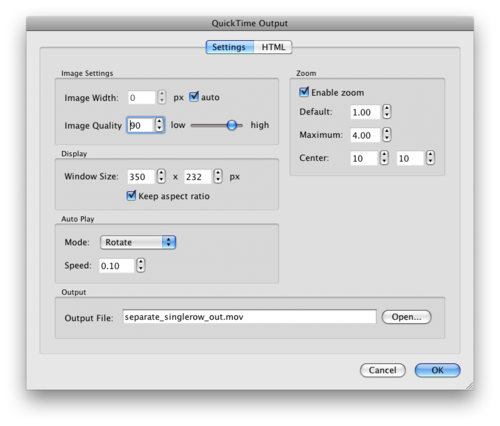
Image Settings
Image Width: Define the image width of your project in pixels.
- Choose Auto to use the original width of the images.
Image Quality: The overall quality of the image. Use the slider to define the JPEG quality or type in the value.
Display
Window Size: This is the size of the movie window.
- Select Keep Aspect Ratio to ensure that the aspect ratio doesn’t not change when adjusting the window size.
Auto Play
Mode: How the movie will rotate. Choose from three rotation options:
- Off: Select this option when you wish to not have your movie automatically play.
- Rotate: The movie will fully rotate through all images.
- Ping-Pong: The movie will rotate back and forth from the first and last images.
- Speed: The speed at which the movie will rotate. (The default speed, 0.10, refers to one tenth of a degree per frame.)
Zoom
To allow zooming in your object movie, select Enable zoom.
Default: The initial zoom level. A default zoom of 1 means the image will be at its original zoom level (or have no zoom.)
Maximum: The maximum zoom level. The default is set to 2. This means the movie can be zoomed in two times it’s default zoom.
Center: Adjust the center of the zoom.
Output
Output File: This displays the name of your file when outputted. Choose Open to select a different destination for the output. By default, the QuickTime movie will be saved to the same directory as the image.
HTML Tab
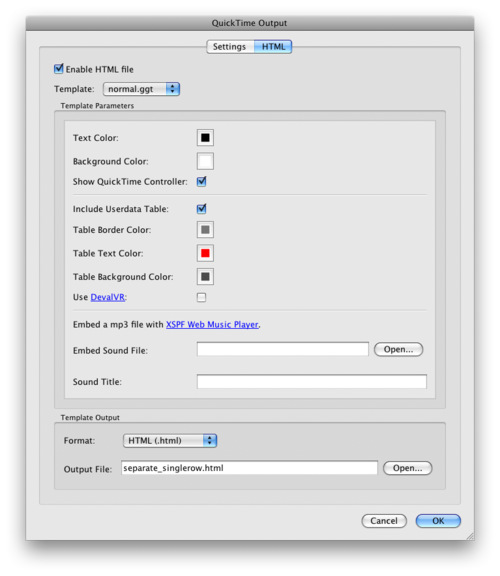
To inlcude an HTML template when outputting your movie, select Enable HTML File. This file can then be later edited and customized for your needs.
Template: Currently, there is only one template to choose from: normal.ggt.
Template Parameters
Text Color: Use the color picker to choose a color for the HTML text.
Background Color: Use the color picker to choose a color for the background of the HTML page.
Show QuickTime Controller: Choose to show the original QuickTime Controller or not.
Include Userdata Table: Select this to show the information entered in the User Data section.
Table Border Color: Use the color picker to choose the border color for the user data table.
Table Text Color: Use the color picker to choose the userdata’s text color.
Table Background Color: Use the color picker to choose the userdata table’s background color.
Use DevalVR: This this if you plan to use the DevalVR player.
Embed Sound File: Choose Open to add sound file to play during the movie using the XSPF Web Music Player.
- NOTE: Only MP3 files!
Sound Title: Add the sound file’s title here. This will be displayed on the music player.
Template Output
Format: Choose from .html or .htm as the file’s format.
Output File: Choose Open to find a destination for the output.
- $n is a placeholder and will be replaced with the name of the images’ folder.
- TIP: Save the the HTML file in the same directory as the QuickTime movie.

