Contents
Install the Drupal Plugin
- Download the plugin.
- Log in to the administration area of your Drupal site.
- Go to Modules > Install new module.
- Upload and install the Drupal plugin file (ggpkg_drupal_1_0_0.zip).
- You can find the Plugin in the Media section of your Modules page. Make sure it is enabled.

- Now go to Configuration > Development > Performance and click Clear all caches.
Add GGPKG Field to an Article or any other Content Type
- Go to Structure > Content types > Article.
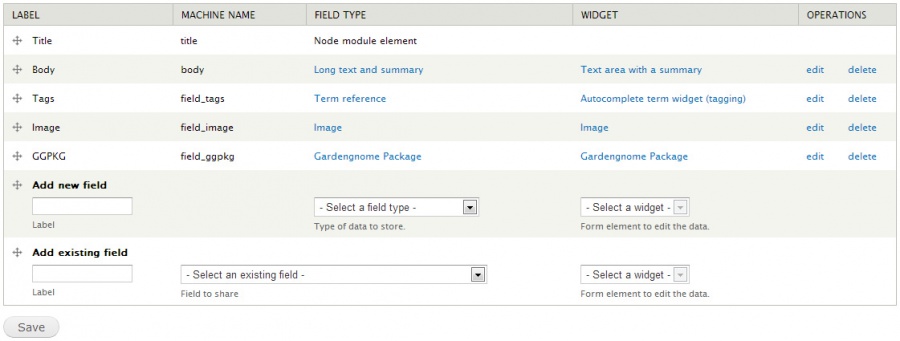
- Click Manage Fields.
- Under Add new field, specify a name for the field, like GGPKG.
- Under Field Type, select Gardengnome Package.
- Under Widget, also select Gardengnome Package.
- Click Save.

Add a Package File to an Article
- Create a new article by choosing Content > Add content > Article.
- On the Create Article page you will now find a section, GGPKG – or whatever name you specified for the GGPKG field.
- Select and upload your .ggpkg file.
Change Display Settings of the GGPKG field
- Go to Structure > Content types > Article.
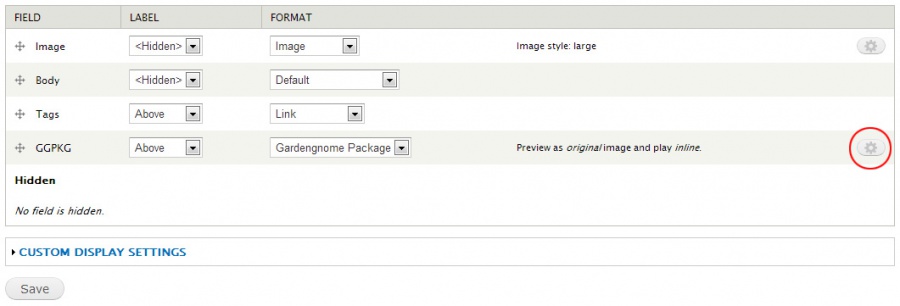
- Click Manage Display.
- Click the gear icon next to the GGPKG field.

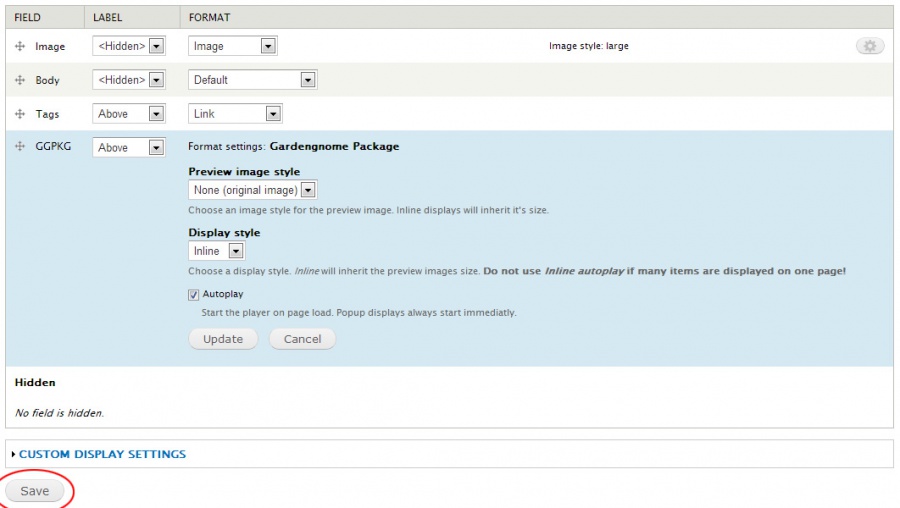
- Specify the settings for the GGPKG Player:
- Preview image style: Set the player’s dimensions. You can specify your own dimensions under Configuration > Media > Image styles.
- Display style: Choose between Inline and Popup. Inline displays the GGPKG content directly inside the article. Popup displays a preview image and a popup window opens when the image is clicked.
- Autoplay: Defines if the player starts immediately on page load. When not selected, a preview image is displayed instead, which has to be clicked to start the player.
- After you have changed settings, click Save at the bottom of the screen.
See also
Download the Plugins
Installing modules in Drupal
CMS Plugins
HTML5 Output (Pano2VR)
HTML5 Output (Object2VR)
User Data (Pano2VR)
User Data (Object2VR)
