However, this document is still valid for the current version of Object2VR!
This tip will guide you through the process of putting lens flares in your panoramas. The lens flare effect can be adjusted to the different light sources by making them brighter for closer light sources or you can tone them down for light sources further away.
Download the Lens Flare project
Download the Lens Flare plugin
The lens flare is added to the skin and then called via the hotspot editor. This is how it’s done.
- Download the lens flare plugin. Unzip the file and in the folder you will see lensflare.swf; this is the plugin.
- Open the project file you wish to see the lens flare in.
- Open the Skin Editor and drag in lensflare.swf to the editor.
- You may wish to give it a more specific ID, like lensflare.
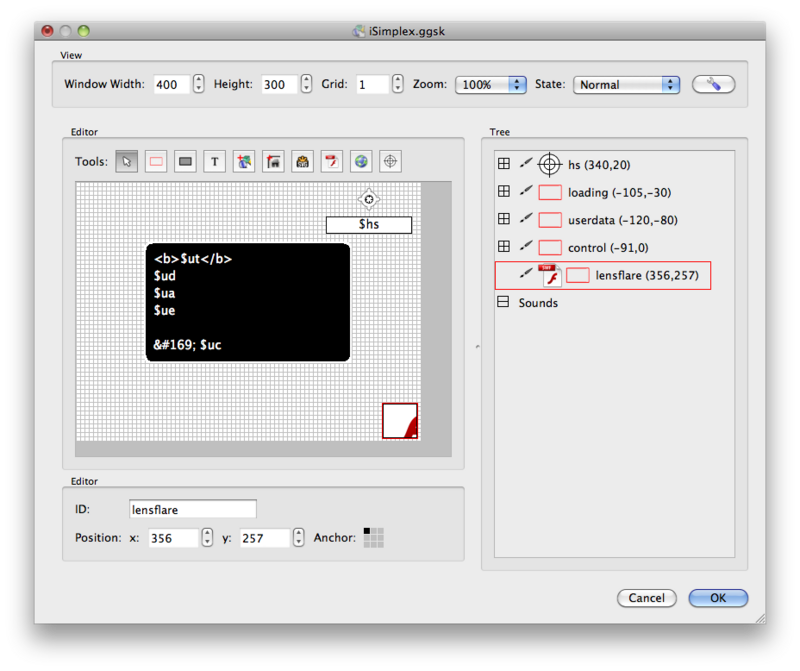
- Add a Hotspot template to the skin and give it an ID.

- Save and close the Skin Editor.
- Open the Hotspot Editor and add a Point Hotspot to where you would like the lens flare to be.
- For the hotspot’s ID add: _flare. You must use this or the lens flare will not show.
- For the Skin-ID, add the ID of the Hotspot Template you placed in the Skin Editor earlier. This will ensure that no other hotspot templates and hotspot images will be used in this location.
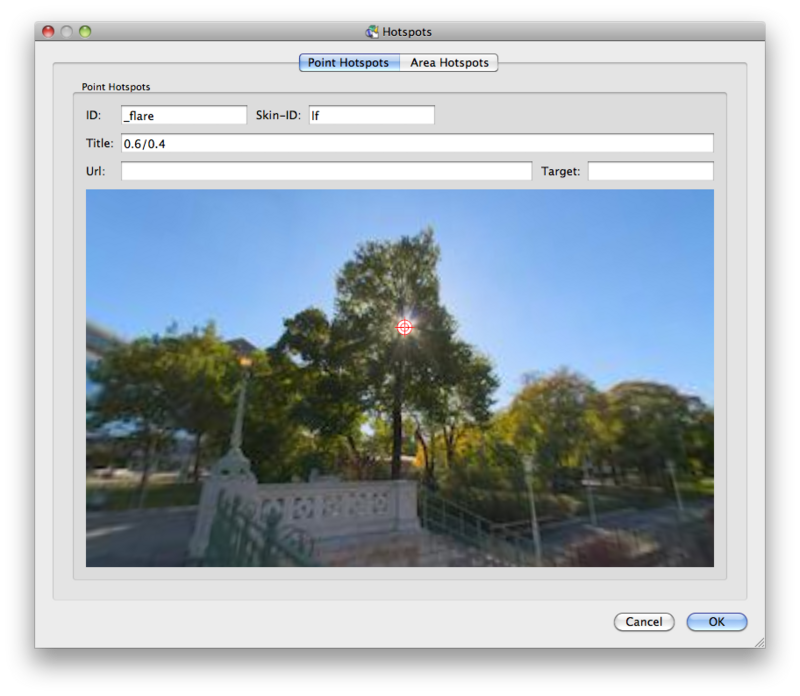
- In the Title you will set the variables that the lens flare will use. The first is adjusting the Alpha (transparency), the second is the Blinding effect, this is how bright the panorama gets when you look at the light source. The variables are entered like this: 0.6/0.4. So, Alpha/Blinding. The settings are from 0.0 to 1.0, you can go higher, but it is not recommended.
- Click OK to exit out of the Hotspot Editor and then click Create All to save the information to the panorama.


◊ TIP: If you are using the flares in a tour, be sure to add the plugin to the starting panorama’s skin.
◊ NOTE: Leave the Lens Flare Plugin in the root of the Skin Editor’s file tree so other Hotspot Template’s can use it. If you make it a child or one of the templates the others will not work.
- If your panorama has more than one light source, you can adjust the Alpha and the Blinding effect so the closer light source is brighter then the ones further away. A good setting for a close light source is 0.6/0.4. light sources further away should be below these settings.
- If you do not wish to have the lens flare visible but want the blinding effect you would set the first variables to 0, so it would look like this 0/0.4. This works for the blinding effect as well; to have the lens flare and no blinding you would have 0.6/0.